Heirloom Tomato Pie


I’ve been in Nashville for more than 15 years now, and I’ve learned to embrace a lot of the Southern culture. I am enamored by the slower pace, the charming brick houses, and white church steeples that peer atop the gold and amber trees during Fall. I catch myself saying y’all… and I drawl out certain words, doubling their syllables. I’ve even listened to a country song here and there, and didn’t hate it. And I may or may not have tried on a pair of cowboy boots recently.

But Southern food? Oh dear Lord, the food. Try as I might, I have not learned to love it… or even tolerate it. I don’t like the smell of fried food. I don’t like brisket or bbq sauce. I don’t like sweet potato pie and I can’t stomach even walking into a Meat & Three (which I’d never even heard of before moving south).  I take pride in the fact that I have successfully avoided stepping foot into a Shoney’s for 15 years. That alone should earn me a West Coast badge. And don’t even get me started on the copious amounts of shortening that run through the veins of true Southern women.

But this past weekend, in an attempt to celebrate the tomato… something East Nashvillians have been doing for the past nine years at what’s now known as, “TomatoArtFest“… I decided to make a VERY Southern dish… the tomato pie.  In the south, the month of August is when tomatoes are in their prime. They are the sweetest, juiciest and most plentiful. It’s funny, because up until this year, I’ve not been a big tomato fan. But I began buying from local farmer’s, and spending a little more on quality heirloom tomatoes. Then I learned that I have been killing their taste all these years by putting them in the refrigerator!  Yes, that’s right… you’re not supposed to refrigerate tomatoes.  Who knew? According to Peggy Trowbridge Filippone, the author of Tomato Selection and Storage, “Refrigeration is the enemy of the tomato as it nullifies flavor and turns the flesh mealy. The culprit is a compound called Z-3 hexenel, which accounts for the tomato’s scent and taste.” She goes on to suggest that if you must refrigerate tomatoes, take them out about an hour before you will use them to allow the tomatoes time to return to room temperature. All that to say, I have become a tomato-convert!

So, quick – before August is over – go visit your local farmer’s market and pick out a nice firm but tender heirloom… my favorite is called Mr. Stripey (seen to the right over there). I mean, the name alone is worth spending $1.00 on him. But to me, he (yes, I’ve given Mr. Stripey a gender) is the sweetest, least acidic of all the heirlooms.

I loved that for this pie I used tomatoes and onions from local farmers, basil from my friend Lisa’s garden, and thyme from my potted garden!

So grab several, keep them on the counter, and enjoy!

Ingredients

1 9-inch pie shell (unfrozen)
1/2 medium to large red onion, chopped
3-4 heirloom tomatoes, cut in half horizontally, roughly chopped, to yield approximately 3 cups chopped tomatoes. Or thinly slice to layer into pie – your choice.  TIP: salt tomatoes and set aside for 20 minutes to remove extra water – important step or your pie will be soggy.
1/4 cup *chiffonade of basil (about 8 leaves)
1 tablespoon fresh thyme (leaves stripped off stems and finely chopped)
2 cups grated Swiss or Gruyere cheese
3/4 cup Just Mayo
1 teaspoon (or more to taste) of Tabasco or your favorite hot sauce
1 tablespoon of Dijon mustard
Salt and freshly ground black pepper

*Chiffonade basil leaves by stacking them on top of each other, roll them up like a cigar, starting at one end slice crosswise in thin slices.

Preparation
Squeeze as much moisture as you can out of the chopped tomatoes, using either paper towels or place them in colander, lightly salt and let drain. The salt will draw out the excess moisture.

In a medium bowl, mix together the grated cheese, mayonnaise, Tabasco, fresh thyme and the salt and freshly ground black pepper. The mixture should be the consistency of a gooey snow ball.

Ready to Cook?
Preheat oven to 375°F.  Place pie shell in oven and cook for 8-10 minutes or longer until lightly golden.

While the pie crust is still warm, brush on your favorite Dijon mustard. Then sprinkle the bottom of the pie crust with the chopped onion. Spread the chopped tomatoes over the onions. Scatter the sliced basil over the tomatoes. Spread the cheese mixture evenly over the tomatoes, covering to the edge of the crust.

Place in oven and bake until browned and bubbly, anywhere from 25 to 35 minutes. Let cool for 35-45 minutes before slicing and serving. you can reheat it if you want but trust me on this, if you cut it too soon the “pie” shape will not hold. Don’t believe me? Check out my first slice below (5 minutes out of the oven). More like tomato stew than pie.

The Perfect Bite
Obviously the best bite is when it’s warm and the cheese is all melty… but please heed my warning above. Let it cool first so it will set into a “pie” shape when you slice it  — then reheat if if you must. But I did eat this cold for breakfast the next morning and it was pretty tasty!

The Perfect Pairing
One of my favorite red wines is a Washington Merlot called 14 Hands. And I just found out that they produce a chardonnay as well! 14 Hands chardonnay would be a perfect compliment to this rich southern pie. Bright apple and floral aromas are complimented by light notes of vanilla and sweet butterscotch. Juicy pear and apple flavors give way to subtle touches of toasty spice and ends with a soft finish. I love the butteryness of a chardonnay – which means it must be appealing to my inner-Southern Paula Dean.

The Perfect Health
Tomatoes are well-known for being low in fat, sodium and calories. But did you also know that tomatoes make your skin look great?  Beta-carotene, also found in carrots and sweet potatoes, helps protect skin against sun damage. Tomatoes’ lycopene also makes skin less sensitive to UV light damage, a leading cause of fine lines and wrinkles. Read more HERE.

Vegetarian Spring Rolls w/Peanut Sauce


Once again I am trying to duplicate something from my favorite Thai restaurant, Thai Phooket. But I love Spring Rolls, especially because they’re fresh and healthy and dipped in a sauce made from peanut butter and Asian spices! Um hello… speaking my language here.

I stumbled across the rice paper wrappers at Nashville’s downtown International Market. So I thought I’d give it a shot. After some online research (Have you checked out TasteSpotting?) I set out to wrap some veggie Spring Rolls.

Let me emphasize here how important it is to establish your mise en place. This process goes quickly once you start rolling the rice paper… so, as always, I suggest reading through the entire recipe before beginning. Once all your veggies and herbs are chopped and ready, make your peanut sauce… since spring rolls are best eaten immediately after being assembled. And you don’t want them sitting around getting soggy while making your sauce.

Ingredients

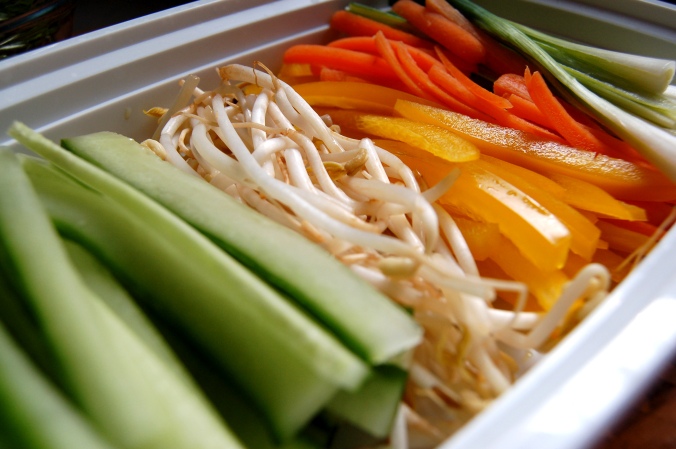
Carrots
Yellow bell peppers
Green onions
Cilantro leaves
Avocado strips
Bean sprouts
Cucumber
Avocado
(all veg sliced julienne in the slimmest cut you can manage. Quantities vary based on how thick you want your rolls to be. I suggest 1.5-2″ around.)
Rice paper wrappers
Fresh basil, mint and cilantro leaves – chiffonade cut

Peanut Dipping Sauce
1 clove garlic, minced
3 tbs. rice vinegar
1/2 c. Tamari soy sauce
1-2 tbs. Siracha chili sauce (really however much or little you want)
1/2 c. peanut butter
juice of one lime
2 tbs. sesame oil

Preparation
Julienne all of your veggies in long 2-3″ strips
Roll herb leaves together and slice into a chiffonade and set aside.
Get a fry pan or deep plate that’s at least 12″ across. Fill with warm (not hot) water. You will use this to soak your rice paper wrappers.


Ready to Cook (or rather, assemble)?

For the Peanut Sauce:
Put all sauce ingredients into a food processor and blend until smooth. It should be creamy but not too runny. Be sure to taste and adjust accordingly. I like it spicier, you may like it more nutty.
For Spring Rolls:
Soak your rice paper sheets in the pan of warm water for roughly 15 seconds.
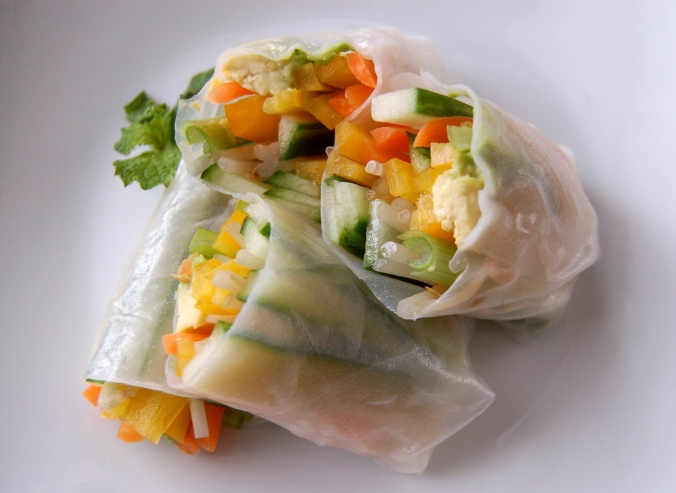
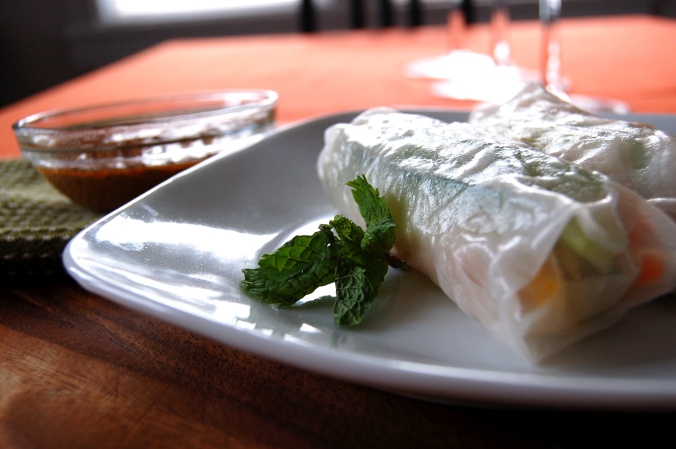
Begin layering your veggies and sprinkling the chiffonade of herbs across the veg. Once all your ingredients are stacked lengthwise, fold “burrito style” – i.e., Fold in the top and bottom of the roll, and then fold over one side, and roll tightly towards the other. The wrapper will stick to itself well and hold everything together. If your wrapper is drying and does not seem  to seal tightly, dip your finger in water and paint over all the seams.  Place seam-side down on plate. You can serve these whole (below) or cut in two (above)… which ever you prefer.

The Perfect Bite
Just drizzle a little peanut sauce into the roll and enjoy! TIP: if you spoon the sauce onto the cut roll verses dipping straight into the sauce, your roll will stay together better.

The Perfect Pairing
Yalumba makes an amazing little viognier… which is a white varietal that is similar to chardonnay, but not nearly as oak-y.  Richer in musk and spice it’s a perfect balance for the crisp fresh vegetables in the spring rolls and is smooth enough to ease the heat of the peanut sauce.

The Perfect Health
These little beauties are so healthy! Not only are they packed with nutrients from the vegetables and herbs, but they’re a mere 63 calories per roll (95 calories if you add shrimp). Of course there’s 50 calories per tablespoon of peanut sauce… but it’s so rich it only takes a little. So enjoy!

Italian Pork Tenderloin


It’s not often that my first attempt at a new dish is successful. It usually takes some tweaking and experimenting until the flavor profile is just right. But after doing some online research and looking at all the ways people make pork tenderloin… I decided to go with Italian… and got right to work. The one consistent piece of advice I read regardless of the recipe… was that I should brine the tenderloin first. I’ve also never attempted to brine something before so it was quite a day of firsts!

So here we go!

Start with brining which enhances juiciness and is simpler than you think. Just mix a quart of cold water, ½ cup sugar and ¼ cup table salt in a large resealable plastic bag (include other spices, aromatics and lemon or lime zest for more flavor). Even 30 minutes will make a difference, but you can brine it up to 8 hours in the fridge. Be sure not to add any vinegar products or it will dry out the meat.

Ingredients
1-1.5lbs pork tenderloin
¼ cup mascarpone cheese
¼ cup pesto
2 tablespoons each of the Italian Big Five (thyme, rosemary, oregano, sage, basil)
1 pinch of salt (remember the brine already adds a lot of salt)
1 teaspoon black pepper
1 tablespoon extra virgin olive oil

Preparation
Remove any excess fat from the outside of the tenderloin. Then take a sharp knife (do you have a sharpening steel? A sharpened knife makes all the difference! Never sharpened a knife before? Check this out)… and slice through the tenderloin lengthwise but not all the way through… this is called a butterfly cut.

Stir together pesto (either store bought or homemade) and room temperature mascarpone until creamy and thoroughly mixed. Then take the pesto mixture and spread it across the meat interior. Fold meat back together and either tie together with kitchen string or seal edges with toothpicks.

On a flat plate… mix together all the dry herbs (thyme, sage, rosemary, oregano, salt & pepper) and roll sealed tenderloin until covered with seasoning. The rub will stick best if meat is dry.

Ready to Cook?
In a stove-to-oven pan heat the olive oil. Use just enough to coat the bottom or you won’t get a good sear on your meat. Sear meat for a good 3-4 minutes on each side. And don’t forget the ends of your meat! Once you see a good darkened layer transfer the pan to a 425 degree oven. Bake for 15-20 minutes or until internal temperature is 145 degrees. I prefer my pork to be slightly pick in the center – if you prefer yours more well-done… let it get to 155 degrees. Remove from the oven and place the tenderloins on a plate. Tent the pork with foil and let it rest about 5 minutes before serving.

Cut your tenderloin into 1/4-1/2 inch slices and fan out on your serving platter. Make a quick pan sauce by de-glazing the skillet with chicken broth or white wine. Add a spoonful of mascarpone to thicken the sauce. Drizzle over your pork medallions and garnish with rosemary sprigs.

The Perfect Bite
Be sure to swirl your bite of pork in the herb and mascarpone sauce that you just made and drizzled over our dish. If serving with pasta or a couscous… be sure to scoop some of that as well.

The Perfect Pairing
A great wine to go with just about any pork dish… but especially this one’s Italian flavor profile… is the A to Z Pinot Noir. This wonderful little 2008 Oregon wine is heartier than most pinot noirs and its peppery tannins bring a great balance to the sweetness of the mascarpone filled pork. You can find in in most wine stores for about $20.00 a bottle.

The Perfect Health

It’s true: Pork really is the other white meat. Ounce for ounce, pork tenderloin has less fat than a chicken breast. And food scientists are finding ways to make it leaner and leaner every year. Best Tip: Avoid cured meats.  Read more here.

Butternut Squash Lasagna


It’s a misnomer that butternut squash are just a Winter vegetable. Here in Middle Tennessee we have big beautiful squash year long… especially if you get them from your local Farmer’s Market. Granted, there’s a larger abundance of them in the Winter – but you can still easily find them now.

This recipe is made with a butternut squash puree and a nutmeg & basil rue. Sound a little complicated? Only slightly… but the results are ridiculously tasty and you can make a large batch and freeze the remaining. I’ve also included sweet Italian sausage in in this but you can make it vegetarian-friendly if you prefer.

Ingredients

1 tablespoon olive oil
1 (1 1/2 to 2-pound) butternut squash
1 lb sweet Italian sausage (usually found in links)
Salt and freshly ground black pepper
1/2 cup water
3 amaretti cookies, crumbled (optional of you can’t find)
1/4 cup butter
1/4 cup all-purpose flour
3 1/2 cups whole milk
Pinch nutmeg
3/4 cup (lightly packed) fresh basil leaves
12 no-boil lasagna noodles
2 1/2 cups shredded whole-milk mozzarella cheese
1/3 cup grated Parmesan

The Rue

Melt the butter in a heavy medium-size saucepan over medium heat. Add the flour and whisk for 1 minute. Gradually whisk in the milk. Bring to a boil over medium-high heat. Reduce the heat to medium and simmer until the sauce thickens slightly, whisking often, about 5 minutes. Whisk in the nutmeg. Cool slightly. Transfer half of the sauce to a blender*. Add the basil and blend until smooth. Return the basil sauce to the remaining sauce in the pan and stir to blend. This is your basil-nutmeg rue. Season the rue with salt and pepper, to taste.

The Squash Puree

Cut squash in half lengthwise and scoop out seeds, then quarter if squash is large. Coat in olive oil and place flesh side down on cookie sheet. Roast on top rack of oven at 425ountil tender… roughly 45-50 minutes. Be sure to use a cookie tray with at least a 1/2 inch lip as squash will give off a lot of water.

When squash is done, scoop flesh from peel and put in food processor. Add crumbled amaretti cookies and a pinch of salt. Puree until smooth. TIP: When blending hot liquids – remove liquid from the heat and allow to cool for at least 5 minutes. Transfer liquid to a blender or food processor and fill it no more than halfway. If using a blender, release one corner of the lid. This prevents the vacuum effect that creates heat explosions. Place a towel over the top of the machine, pulse a few times then process on high speed until smooth.

Ready To Cook?
Position the rack in the center of the oven and preheat to 375 degrees F.

*Saute and brown sausage in a skillet. Break up into 1/2″ pieces.  Drain and set aside.

Lightly butter a 13 by 9 by 2-inch glass baking dish. Spread 3/4 cup of the sauce over the prepared baking dish. Arrange 3 lasagna noodles on the bottom of the pan. Spread 1/3 of the squash puree over the noodles. Sprinkle with 1/2 cup of mozzarella cheese. Drizzle 1/2 cup of rue over the noodles. Repeat layering 3 more times. *Scatter sausage on second layer and cover with the mozzarella.

Tightly cover the baking dish with foil and bake the lasagna for 40 minutes then remove and uncover. Sprinkle the remaining mozzarella and Parmesan cheeses over the lasagna. Continue baking uncovered until the sauce bubbles and the top is golden, 15 minutes longer. To firm up, let the lasagna stand for at least 20 minutes before serving.

The Perfect Pairing

It’s a sultry summer – try your hand at making a sangria. Sangria’s come in all types and flavors – check out this great site filled with Sangria recipes.

The Perfect Health

Butternut squash is not just low in fat and calories, but these squash are high in Vitamins A & C and high in Potassium and dietary fiber. It’s also a great source for anti-oxidants and works toward heart and lung health. Read here for more details

La Bella Burger


This spicy Italian burger, oozing creamy mozzarella from every bite with bursts of sweet roasted red peppers and tangy pesto sauce… is an all-time crowd pleaser. I served all 3 of the international burgers (from recipes shown on this site) on 4th of July this year… and this was voted the favorite of the night. This burger is probably the most time intensive of all the ones I do… but completely worth the effort.

Ingredients
1 lb ground turkey – dark meat if possible (does not dry out as bad)
1 lb sweet Italian turkey sausage (usually found in links)
1 egg
1 tbsp fresh garlic
1 tbsp finely chopped dry oregano
1 cup finely chopped fresh basil (divided – use 1 tbsp for meat mixture)
1 tbsp finely chopped dry thyme
1 tbsp finely chopped fresh rosemary
1 tbsp extra virgin olive oil
1 tsp salt
1/2 pepper
8oz fresh mozzarella
1 sliced red bell pepper
1 cup spinach leaves (remove stems)
4 sourdough baker’s roll
Pesto Sauce
finely chopped fresh basil (remaining cup)
3-4 tbsp extra virgin olive oil
2 tbsp pine nuts – toasted
1 tbsp mayonnaise
1/4 tsp salt
a pinch of black pepper

Preparation
Mix first 8 ingredients together thoroughly… then add salt & pepper and olive oil. Turkey meat has a tendency to dry out quickly on the grill, so the olive oil will help maintain a tender, moist burger.

Form 8 thin patties with the meat mixture. Cut mozzarella cheese into 1/4 inch pieces. On top of one patty, scatter 4-5 mozzarella pieces throughout the center of the meat… leaving a little space between each cube. Be careful not to put cheese too close to the edges or it will leak out during grilling. Place another patty on top and seal edges together until cheese is completely buried.

Cut off the top of the red bell pepper and remove seeds and core. Then slice into 1/4″ rings and brush lightly with olive oil.

Pesto Sauce
In a dry frying pan, quickly toast the pine nuts. Should take less than 3 minutes. In a food processor, pulse basil leaves, toasted pine nuts and salt & pepper…. simultaneously adding olive oil through the feed tube. Once good puree is achieved, add the mayo and pulse 2-3 more times, scraping sides to make sure it’s thoroughly mixed. Don’t leave the processor on or the mixture will be too fine. You want some texture in order to taste each ingredient.

Ready To Cook?
Cook burgers meat over medium heat. Be sure to coat grill with non-stick spray. Cook about 8-10 minutes on each side (varies based on your grill – mine is slow). Keep in mind that turkey burger and turkey sausage will look different than beef or pork… and the sausage lends a reddish color, which can be mistaken for rare meat. Cook on the high end of 12 minutes if you want to be safe… though be careful not to cook too long or your burger will dry out. Try not to flip the burger too often as it tends to crumble. If the mozzarella starts to ooze out, don’t worry… that’s a sign that your burger is almost done.

Please red pepper rings on the upper or outer edges of grill. Cook 3-4 minutes on each side. Brush olive oil on the insides of both halves of the sourdough buns and also place on the upper or outer edges of grill. Remove when lightly toasted.

Spread pesto sauce on top & bottom bun. place spinach leaves on bottom bun and place meat on top of spinach leaves. Garnish top of meat with grilled red bell pepper, fold the halves together and you have La Bella Burger!

The Perfect Bite
I think the perfect bite here… is the first bite. The unexpected burst of hidden mozzarella cheese and spicy sausage leaves most people exclaiming, “Oh my gosh – what’s in this?!”. But it’s a burger… so every bite will be perfect. Reserve extra Pesto sauce for dipping your burger… and anything else you can find – dip away!

The Perfect Pairing
A pasta side might seem an obvious choice for an Italian burger, but that’s probably going to be too heavy. A green salad with Italian dressing would set this off perfect… try this salad. And you probably think I’m going to suggest a red wine… well, you’re right! I just got a bottle of a California Cabernet from Napa Valley called Avalon. But be sure to get the 2006 vintage – 2005 has gotten horrible reviews. A bad year for the folks at Avalon, I suppose. A bottle normally runs in the $12-$14 range… but on sale now 3 for $21.99 at Main Street Liquor in East Nashville! See it pays to live here on the Eastside…

Did You Know?
What is Extra Virgin Olive Oil and how can something be Extra Virgin? Someone had to ask, right?

Extra virgin – considered the best, least processed, comprising the oil from the first pressing of the olives.
Virgin – from the second pressing.
Pure – undergoes some processing, such as filtering and refining.
Extra light – undergoes considerable processing and only retains a very mild olive flavor.

Why cook with olive oil versus Canola oil? Canola oil is a relatively recent development and the original crops were unfit for human consumption due to their high content of a dangerous fatty acid called euric acid. Canola marketers advertise that their oil has less fat content… however, they fail to mention that when heated (which is what happens when you cook.. hello) the oil tends to transition into dangerous trans fatty acids. Ahem. We don’t want that. Read here for more details.

Zucchini Flutes Piped with Basil-Ricotta Mousse


This delicious side dish has morphed over the last few times I’ve made it… trial and error play a big part in creating dishes…. at least, when I’m creating dishes. But I believe this one has finally become what just might be something close to perfection. Well close… anyway.

One of the beautiful things about zucchini is the range of sizes they come in… the ones I chose for this recipe were roughly 4-5 inches in length… with the intention of using them as a compliment to an entrée. But, as you will see *later in the recipe… with a few modifications, they can be used as a main dish. Just go to your local Farmer’s Market and grab a few of the big daddies… they can grow to be a full foot long and 2-3 inches in diameter.

Ingredients
(this recipe serves 4 as a **side dish)
2 medium Zucchini
1/4 cup fresh basil leaves – torn
2 tablespoons minced garlic
1 1/2 cup ricotta (use my ricotta recipe for the freshest taste!)
4 tablespoons of shredded Parmesan cheese (divided)
1 tablespoon extra virgin olive oil

Preparations
Preheat oven to 375 degrees.
Zucchini:
Cut stem tips of zucchinis off and discard. Slice lengthwise into two pieces. Take a teaspoon and hollow out each half… scraping away seeds and core until smooth. Be sure to leave about 1/4 inch of flesh or the flute will be too weak. Set on baking tray.

Mousse:
Put the ricotta, basil, garlic, and half of the shredded Parmesan cheese into a food processor and blend until creamy. If too thick… add just a dab of olive oil. But not too much as you need the mousse to stand firm in the zucchini flutes. Once you reach the desired consistency – scoop the mousse out of processor into a zip lock baggie or pastry bag. If using a baggie, snip off about 1/4″ of the corner and squeeze baggie to pipe out mousse into the hollowed section of the zucchini. Stop short of the end by about 1/2″, as the ricotta will expand when baking. Sprinkle remaining Parmesan cheese along the top of flutes.

Ready To Cook?
Put tray of mousse-filled flutes on middle rack of oven, baking for 20 minutes at 375 degrees. Remove when zucchini is tender to a fork and the cheese has browned slightly. Once flutes are removed from the oven, sprinkle a few ricotta crumbles across the top and lightly drizzle with extra virgin olive oil. Serve immediately.

*If you would like to make a large Zucchini Flute your main dish… just add crumbles of cooked sweet Italian Turkey Sausage (for a healthier option than pork) into your mousse puree. Or keep it vegetarian and add your leftover zucchini scrapings to the puree.

**Zucchini Flutes are shown here with an entrée of Bucatoni noodles, marinara and sweet Italian turkey sausage.


The Perfect Bite
These flutes are so tasty on their own, just slice off a bite and enjoy. Be sure to have some extra fresh basil leaves to tear and add to your dish. If serving with pasta and sausage as I did hear… mix it up and stack your fork with it all!

The Perfect Pairing
One of my new favorite (and inexpensive) reds is the Cycles Gladiator Syrah. It’s earthy and bold and has just the kind of aromas that bring out the best in Italian foods.

Did You Know?
One cup of zucchini has about 35 calories and it contains about 340 milligrams of potassium. Zucchini is a good source of fiber with 4 grams per cup. Be sure to include the peel to get all the fiber.

Insalata Caprese


An eye-catching, palate-pleasing quick & light lunch… if you must add a carb-fix, include slices of toasted sour dough and use them as scoops for your salad bites.

This is also a no-cooking, no-brainer easy way to utilize your surplus of Good Seasons Italian Dressing. And it makes for a light and nutritious meal or a colorful appetizer.

Ingredients:
Fresh Mozzarella
Heirloom tomatoes
Fresh Basil (or in this case, pesto)
Good Seasons Italian Dressing

I use fresh mozzarella. I purchase it at Trader Joe’s, but you can make your own if you feel brave. My friend Stephie did – here’s her recipe. I also get the heirloom cheery tomatoes at Trader Joe’s. I’m pretty sure they have *fresh basil too… so it’s almost a one-stop-shop if you already have the dressing in your pantry or fridge. *If you’re having a hard time finding basil – as I did in this case, use a store bought pesto.

Preparation:
Slice the tomatoes in 1/4 dials – leave whole or cut in half depending on preference. I like using heirloom tomatoes. They’re so colorful and vary in sweetness. But any tomato works well here. Tear large basil leaves into pieces. Slice mozzarella into 1/4 inch dials – mimicking the tomatoes (i.e., making them the same size and shape). On to plate. alternate the tomato and cheese. If you are using fresh basil, tuck a leaf in between each slice.  If using pesto… drizzle across the top of your stacks or rows. Finally, sprinkle with Good Seasons Italian Dressing. Use sparingly – a little goes a long way.

The Perfect Bite:
Stack a slice of tomato, basil leaf and mozzarella wedge on your fork and make sure to swirl in the dressing… it’s an oh-so-good and perfect bite!

The Perfect Paring:
Try a glass of Cline Pinot Gris . I was able to try this little gem at the Cline Vineyards during a wine-tasting tour in Sonoma Valley last year. It’s light and crisp and a perfect pairing that won’t overwhelm the sweet & tangy taste of the Caprese Salad. Roughly $12 a bottle.

Did you Know?
A large consumption of tomatoes can help improve your skin texture and color. There are a ton of health benefits to eating tomatoes! Read more here.