Super Creamy Almond Butter


almond butter

How have I had my Ninja food processer and blender for 3 years and not know it was powerful enough to make nut butter? I have the Auto IQ Boost system and quite frankly – I just use the start and stop button to make smoothies and hummus.

But after a trip to the store to get some almond butter only to discover that the cheapest I could find was $7.00 – I decided I was crafty enough to make my own. I mean, it’s just almonds and salt, right?

So after doing some research and deciding that I think my Ninja can handle the job (even though there’s no preset button for nut butter)… I found raw organic almonds, bought $3 worth and gave it a whirl. Literally. And it did not disappoint! Keep ready for instructions.

INGREDIENTS

  • 2 cups organic raw almonds (or however much you want to make)
  • 1 teaspoon of kosher sea salt (or to taste)
  • 1 drizzle of honey (optional)
  • 1 drizzle of extra virgin olive oil (optional)

TOOLS NEEDED

  • High-powered blender or food processor
  • Spatula
  • Cookie Sheet
  • Parchment paper

READY TO MAKE IT?

almond butter2

Preheat oven to 350 degrees.

Place parchment paper on cookie sheet and spread almonds in a single layer.  No oil is needed.

Roast almonds for 10 minutes and let cool until they are still warm but not hot. You can buy pre-roasted/salted almonds and it will work fine. But the flavor isn’t as good and you don’t get to control the level of salt used.

Add roasted almonds to your blender or food processor and depending on your unit turn it to high speed and let it go. It will take roughly 10 minutes to get it to a smooth consistency. It will seem like it’s never going to happen but be patient! Every few minutes stop the machine and scrape down the sides with the spatula to make sure all your almond goodness is incorporated. Keep in mind, your blender is going to heat up some from working so hard and for so long. You may want to let it cool off for a minute when you pause to scrape down the sides.

And if you are patient and let it go long enough it will eventually become creamy!  Now, this is optional… if you want to add a small drizzle of olive oil to help it along – that is perfectly okay. It’s heart-healthy after all. But if you are avoiding oil then just rely on your patience.

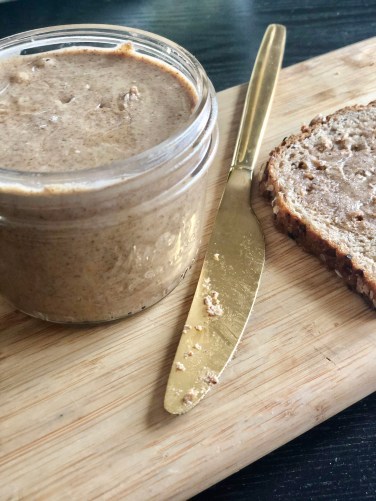
Be sure to wait until your almond butter is just about the consistency you want before adding salt or any other add ons. I suggest tasting it before adding anything so you know what it needs. It added just a little salt and a drizzle of honey and it was good to go. This homemade version is WAY tastier than any store-bought almond but I’ve ever tasted… and was half the cost!

THE PERFECT BITE

s-l640

I put a warm slather of almond goodness on a toasted piece of Dave’s Killer Bread. So much nuttiness!


THE PERFECT HEALTH

Almonds contain lots of healthy fats, fiber, protein, magnesium and vitamin E.

The health benefits of almonds include lower blood sugar levels, reduced blood pressure and lower cholesterol levels. They can also reduce hunger and promote weight loss.

All things considered, almonds are as close to perfect as a food can get.

Read more HERE.


Homemade Granola


JarsI initially made this granola because I finally learned how to make my own yogurt (recipe HERE)! But it turned out so delicious that I plan to make it a regular staple in my pantry. And it freezes well, too!

PRO TIP: The ingredients below are what I enjoy – feel free to substitute whatever nuts or seeds you prefer – but they need to be raw and not pre-roasted or they will overcook. If you want to add coconut or dried fruit – you will need to add that in halfway through the cooking process.

Ingredients

  • 4 cups old-fashioned rolled oats
  • 1.5 cups sliced almonds
  • 1/2 cup sunflower seeds
  • 1/2 cup light brown sugar
  • 1/2 teaspoon cinnamon
  • 3/4 teaspoon kosher salt
  • 1/3 melted butter (you can always substitute coconut or vegetable oil, but I mean, come on… butter!)
  • 1/2 cup honey
  • 2 teaspoons vanilla extract
  • 1 large egg or 2 medium eggs – whites only

Ready to Cook?

Preheat oven to 300 degrees. Line a large baking sheet with parchment paper. Adjust the oven rack to the second level from the top.

Mix the dry ingredients together in a large bowl (oats, almonds, sunflower seeds, brown sugar, and salt). In a separate, smaller bowl mix together the wet ingredients (butter, egg whites, honey, and vanilla). Drizzle over the top of the dry mixture, stirring until well-combined and all the dry has been coated with the wet mixture (

Granola

add additional honey if it seems too dry). Transfer the granola mixture to the baking sheet and spread out evenly with a spatula, pressing down firmly so it’s compact. This will helps create “chunks” of granola later.

Bake for 30-35 minutes – rotating halfway through for even baking. Since all ovens vary – check around the 25-minute mark (especially if you can really smell it!). It should be golden brown with crispy edges, and the nuts should look lightly toasted.  Just keep an eye on it because it can burn quickly!

Remove from oven and let cool completely before breaking into pieces. It should keep in an airtight container up to 3 weeks – if it lasts that long!


Toasted and Roasted Vegetable Israeli Couscous


So I’ve had this jar of tri-color Israeli couscous in my cupboard for awhile now. Wasn’t sure what to do with it. But after a little research I decided roasting and toasting stuff to go in it was my best bet. Sometimes great things happen by accident. I just started throwing stuff in there and voila…. the result was pretty darn awesome. Savory, nutty, spicy… and that mysterious “umami” taste everyone’s talking about. Technically, the term is borrowed from the Japanese, meaning “savory taste”. But we use it meaning “beyond savory”… that something extra that makes you say, “wow!”

Anyway, the beauty of this dish is that you can swap out ingredients (like the veggies) for your favorites. Just be sure to prepare them the same way. Be sure to think about the type of vegetable you’re using to make sure it will go well with the spices used.

It’s a little labor intensive, but makes a huge batch you can eat on for days. Trust me, it’s worth it. Also, there are a few unique ingredients that if purchased in the grocery store, can be pretty pricey. Find a local International Market in your area (you’ll be surprised how many are out there!)… you will pay 1/3 of the price there and get twice as much. That’s where I purchased the turmeric, mustard seeds, cumin seeds, saffron and even the sliced almonds (1/2 lb bag for $4!).

Ingredients
2 cups of Israeli couscous (tri-colored optional. Sometimes called “pearl” couscous)
3 cups low-sodium veggie stock
1 cup water
1 cup fresh broccoli florettes
1 cup fresh cauliflower
1 whole red bell pepper (stemmed, seeded and julienned)
1/2 cup asparagus tips *and 2″long each)
1 cup chopped tomatoes (I used canned, drained and rinsed because that’s all I had)
1 16oz can chickpeas – rinsed
1/2 a medium sweet onion – diced
1 tblspn minced garlic
3 sprigs green onion – diced
1/2 cup sliced almonds (use less if desired – I love almonds!)
1/2 tsp red pepper flakes
1/2 tsp whole mustard seeds
1/2 tsp cumin seeds
1/2 tsp turmeric powder
1/2 tsp saffron
2-3 tablespoons extra virgin olive oil
sea salt and fresh cracked pepper to taste

Preparation
Pre-heat oven to 375 degrees.

This is a perfect opportunity to organize your mise en place.

Dice sweet onion, mince garlic, cut asparagus, broccoli, cauliflower, bell pepper and green onion according to ingredients above. Toss cut asparagus, broccoli, cauliflower and bell pepper lightly in olive oil and sprinkle with sea salt. Spread out on a cookie sheet into one even layer. You may need to do this in two batches.

Ready To Cook?
Place cookie sheet of veggies on top rack of oven (or use broiler). Rack should be roughly two inches from the top. Cook for 15 minutes or until broccoli and cauliflower edges start to get brown and crispy. You can smell when they’re done – yum! While that’s cooking,  drizzle olive oil and heat in  a large soup pot or dutch oven, over medium flame. Add sweet onion, garlic, saffron, turmeric powder and a pinch or two of sea salt. Saute until onions are translucent.

Once garlic and sweet onion are softened, add couscous to the pot and stir consistently. This will toast the couscous and will keep it from becoming mushy. Toast for 2-3 minutes… couscous will start to turn a slight color. Add veggie broth and water. Bring to a boil. Add another pinch of salt and pepper.

While that is boiling, drizzle a tiny amount of olive oil on a saute pan. Once hot, toss in mustard seeds and cumin seeds. They will sputter and splatter so be careful. This only takes a minute – so don’t burn them! You’ll suddenly smell the aromatic seeds and they are ready to throw in the pot of couscous. Reduce pot to simmer. Add roasted veggies, almonds, green onion, chickpeas, tomatoes and red pepper flakes. Stir until well mixed. Remove from heat when all liquid is absorbed. Add salt and pepper to taste.

Serve warm or cold!

The Perfect Bite
If you’ve been reading this blog for awhile, you know I’m about to tell you to stack your fork with a little bit of everything! However, there are so many ingredients in this – that might be impossible. So, take a few bites… you’ll be amazed how each bite will taste like a different dish! I love getting a taste of the earthy mustard or cumin seeds… then heat from pepper flakes, or smoky from the roasted vegetables. You’ll never get bored, bit after bite.

The Perfect Pairing
There are so many flavors happening here you want an uncomplicated wine. Try Cline Cellers 2010 Viognier. Cline’s Viognier offers rich and distinctive aromas of peaches, apricots, orange blossoms and honeysuckle which will compliment the smoky, earthiness of the spices in this dish.

The Perfect Health
I’ve heard so many people say that couscous is a grain. But, um, no. It is pasta. Believe it or not, it’s made from semolina. Often hand rolled and sprinkled with wheat flour to keep separated. Israeli couscous is toasted, rather than dried, which gives it a nutter flavor.

So is couscous healthy? Not necessarily. But it is a healthier option than most pastas. Especially since it’s generally paired with vegetables and not cheese. But it is a little “carby”. Read more HERE about the health pros and cons of our beloved couscous.

The Unagi Burger


This Japanese version of the burger is probably one of my favorites. It’s light and refreshing. You almost forget you’re eating a burger! Biting into a combination of fresh ginger, crisp cucumber and crunchy broccoli sprouts brings you a burst of surprising sweet and tangy goodness.

Ingredients
(makes 4 burgers)
2lbs ground sirloin beef (grass fed)
1/2 cup panko
1 egg
1/2 cup sliced almonds
1/4 cup fresh ginger
1/2 cup green onions sliced
2 tablespoons soy sauce
1/2 tsp salt
1/2 tsp black pepper
2 tsp of sesame oil
3/4 cup broccoli sprouts
*8 pcs of shaved cucumber ribbons (2 per burger)
4 whole wheat baker’s rollWasabi Dressing
1/2 cup mayonnaise
1/4 cup sour cream
2 tablespoons wasabi paste

Preparation
Mix first 7 ingredients together thoroughly… then add salt & pepper. Form patties and pat together well. Because of the volume of ingredients in these burgers… they will fall apart easily on the grill.

*If you don’t have a mandolin slicer, use your regular vegetable peeler and slice the cucumber lengthwise. Don’t peel the cucumber first, you want the dark green edges still on the strip. See here for more details.

Wasabi Dressing
Mix all ingredients well. Taste it and add a little more wasabi paste if you like it really spicy. This can be made ahead of time and last in the refrigerator for a week or more. I always make extra because it makes a great dip.

Ready To Cook?
When ready to grill burgers, test one of the patties to see if it is holding up on the grill and not falling apart. These are delicate burgers to cook. Be sure to coat grill with non-stick spray. If it’s falling apart too much, try browning it in a skillet first so the outside is a little done. B careful not to brown it too much or it’ll dry out on the grill.

Brush sesame oil on the inside of the split baker’s roll and toast on the upper or outer edges of grill. When rolls are lightly toasted, spread wasabi sauce on top bun and add broccoli sprouts. Place meat on bottom bun and 2 cucumber ribbons on top of meat. Carefully fold together and you have The Unagi Burger!

The Perfect Bite
I think the perfect bite here… is the first bite. When all those fresh ingredients explode in your mouth for the first time. But it’s a burger… every bite will be perfect.

The Perfect Pairing
As a side dish… opt for a bowl of edamame instead of fries or chips. And if you haven’t tried sake before… now might be a good time to try it. Gekkeikan Sake can be served chilled or warm. Serve in small demitasse cups if you don’t have sake cups on hand.

The Perfect Health
Modern scientific research has revealed that ginger possesses numerous therapeutic properties including antioxidant effects, an ability to inhibit the formation of inflammatory compounds, and direct anti-inflammatory effects. Read more here.
The Unagi Burger on FoodistaThe Unagi Burger

The Backyard Salad


I love a big salad. A leafy bowl of green goodness, garnished with bright fresh veggies, crunchy nuts, earthy avocado chunks, tangy crumbled cheese and of course , topped with my favorite part of the salad: Good Seasons All Natural Italian Dressing.

This recipe is quite simple and you may be thinking, “Deb, why do I need a recipe for salad? I mean, come on… it’s just salad!” But this particular “recipe” is packed full of proteins (which aren’t normally found in your average side salad) and is hearty enough to be a complete meal in itself. Even for the burliest hungry-man (he may protest initially, but he’ll find himself perfectly satisfied by the time he reaches the bottom of the bowl), and it’s tasty enough for even the pickiest of kids. Also, it’s a great source of filling protein for your die-hard vegetarians. I made this for my friend Cara and I last night. She’s a self-proclaimed “Veg-Head” who was completely full after one plate.

History of the Backyard Salad Name
Kids love this salad and you’ll finally get them to eat spinach without a fuss! When my niece Katelyn was 8 years old (she’s now 11), she took one look at the salad and said, “Aunt Debbie, did you just pick these leaves off the tree in the backyard?” I simply smiled and said, “Maybe…”. She laughed and said, “Cool!” And dug right in. She calls it my Backyard Salad.

So take the challenge and tell me if you finally got your kids to eat spinach. And tell me if you’re still left hungry after polishing off a big bowl of Backyard Salad!


Ingredients

(serves 3-4)
1 large bag of baby spinach leaves (much better for you than iceberg or lighter leaf lettuces & doesn’t turn brown when air hits it)
1 large avocado
2-3 med tomatoes-on-the-vine
1 large cucumber
1 cup of croûtons (make your own by tossing cubed day old bread in olive oil, garlic and salt and bake for 8 minutes at 350 or until golden brown).
1/2 cup of roasted sliced almonds (I use Almond Accents Original when I don’t have time to roast my own)
1/4 cup of Vegan Feta


Preparation:

-Wash bagged spinach leaves and put in large bowl.
-Peel and cut cucumber lengthwise in half, then cut into 1/4″ slices.
-Cut tomatoes into 1/4 inch slices and then into quarters.
-Cut avocado in half, remove pit, then slice halves into 4 sections lengthwise. The skin will peel off much easier this way. Then cut your 8 slices into 1″ chunks. A too ripe avocado will turn into mush. Look for fruit that is semi-firm to the touch.
-Add cut veggies and remainder of ingredients to the salad and toss.
-Add 4-5 tablespoons of salad dressing and toss again. It covers a lot but add more if desired. Be careful to not add too much before tossing, or salad can end up soggy.
-Serve in large individual bowls and enjoy!

(If you reserve a handful of spinach leaves and croûtons, you can add them to your leftovers (if you have any) the next day, re-toss and it will revive your somewhat soggy salad. You probably don’t need to add any more dressing of tossed well.)

The Perfect Bite
I like to stack on my fork a piece of  avocado and tomato with a big spinach leaf… then swirl it around to pick up bits of the crumbled feta and almonds.

The Perfect Pairing
I’m not a fan of fresh fruit in my salad, though some people like to add pears, strawberries or mandarin oranges. Instead, I prefer to pair The Backyard Salad with a crisp, fruity fermented beverage. Monterey’s Bogle Chardonnay adds the perfect touch of green apple and ripe pear. All the fruit I need with this meal!


Did You Know?
A new little handy item I’ve recently discovered is the Hefty Fresh Extend zip-lock baggies. These one gallon gems literally extend the life of fruits and vegetables in the fridge. I like to stock up at the Farmer’s Market… but my fresh goods usually get tossed from rotting before I can consume them all (especially with my travel schedule). The Hefty Fresh Extend baggies have saved me from throwing away food and money.

Baked Almond Chicken Breast with Sliced Avocado


This is a very simple recipe that takes less than 30 minutes to cook… as long as you marinate the chicken the night before.

Ingredients

1-2 boneless chicken breasts
1/4 cup sliced almonds
1/2 avocado, sliced
1 pkg Good Seasons Italian Dressing
1/3 cup avocado or grapeseed oil
1/4 cup apple cider vinegar
1/2 cup water
2 fresh basil leaves, whole

The Night Before:
First, start with the Italian dressing for the marinade. I am cheating a bit since I’m using Good Seasons Italian Dressing (but it even comes with a cute little cruet in the starter kit!). All it takes is one of their magic little seasoning packets, your own cider vinegar, water, and oil… and voila! You will have a dressing that people will crave (friends are constantly asking me to “Bring that salad… you know, the one with the dressing!”). Just follow the directions on the packet. Plan to keep plenty of it in your pantry… you will find dozens of uses for it!

Okay, now put your chicken in a zip lock and add the dressing as a marinade. Zip closed and shake to make sure the dressing completely covers the chicken… then refrigerate overnight.

Ready to Cook?
Preheat oven to 425 degrees. Pour all the contents from the zip lock into the baking dish. You’ll cook the chicken in the remaining marinade. Bake uncovered on the middle rack for 20 minutes. Then remove and sprinkle with sliced almonds. Return to oven and bake for an additional 5 minutes. Some ovens may vary… but be sure not to overcook the chicken or it will dry out. But for a small to medium-sized chicken breast, 25 minutes it should still be juicy but you should not see pink in the middle of the chicken breast. If using pre-cut chicken tenderloins, reduce the total cooking time to 20 minutes.  This recipe works great on the BBQ grill, as well.

Slice half of an avocado and stack on the center of your plate. Place chicken pieces on ton and garnish with basil leaves.

The Perfect Bite:
For a mouth-watering experience, be sure to stack a cut of chicken, a slice of almond, and a piece of avocado together on your fork… and enjoy! Feel free to make appropriate noises of delight.

The Perfect Pairing:
Try a chilled glass of Bolla Pinot Grigio. It’s light and smooth and perfect for a warm Spring evening. $9-$10 a bottle.

Did You Know?
Americans drink red wine too warm and white wine too cold. If you open and set chilled white wine out at room temp for 10 minutes before serving, you will be able to taste the wine as it was meant to taste. And the opposite goes for red wine… it should be chilled for 10 minutes before serving… Read more here.