Cheesy Asparagus Tart


15741038_10154143389889109_7973727600606227231_n

After all the filling holiday meals I decided to go vegetarian the week between Christmas and New Year’s. So l was looking for some creative ideas, as well as a way to clean out the freezer and unused veggies… I came up with this (Inspired by Carla Hall’s Acorn Squash Tart). It took all of five minutes to assemble and 30 minutes to bake – and I guarantee you everyone will ohh and ahh. I posted a photo on social media (because yes, I’m that girl) and my notifications blew up!

Continue reading

Honey Walnut Shrimp


image

I love Chinese food. Not only are they the masters of blending sweet and savory but I can make a meal out of nothing but the appetizers! I love variety and a Chinese menu gives me the opportunity to try many things. And I’m not referring to the fast food “Panda” or food court walkup. I’m talking a real sit down restaurant with a legitimate chef. 🙂

That said – my new found favorite is Honey Walnut Shrimp. It probably one of the more expensive items on the menu but you can make a pound of shrimp at home for under $15.00. I purchased tail off, peeled and deveined raw shrimp but you can save even more if you do the work yourself. Just be sure to devein them – poop tracks are No Bueno.

Continue reading

Pico de Gallo


imageAs I mentioned in a previous post, I recently discovered a little gem of a Mexican market and I have since been frequenting their produce section. Yesterday I walked out with 3 bags of produce including a large pinapple and only spent about $6.00. Ole!

I don’t know about you but for me pico de gallo just screams summer!  Fresh tomatoes, onions, jalapenos, lime juice and cilantro. I want to put it on everything! Not only is it tasty and fresh – but it looks beautiful and makes everything much more appealing. You eat with your eyes first, I always say. So, yes… presentation can be everything. 🙂

Continue reading

Homemade Dill Pickles


closeup2

I love pickles.

Always have…  but it was never something I thought I could make myself. I imagined the process was complicated and required all kinds of equipment – who knew?! You really just need some canning jars – wide mouth are the best – and a few essential ingredients. Kirby cucumbers are the classic pickling cucumber. Be sure to pick ones that are firm and not overly ripe. English cucumbers don’t hold up well and get mushy – and waxed cucumbers are bitter and won’t pickle well. So go to Publix (where I get mine) or your local Farmer’s Market and grab a bunch of Kirbys (or sometimes they’re actually labeled “pickling cucumbers”). I used about 6 pickles to make one quart, cut in coins. It’ll vary based on the size of the pickles.

Continue reading

Kale and Walnut Pesto


Kale is such a super food… add walnuts, olive oil and lemon zest and this little gem is unstoppable.  I’ve struggled to find ways to prepare kale that I enjoy. It can be bitter and a little tough. But I could eat this pesto by the spoonful!  I’m currently enjoying it on a Triscuit® but you can put it on just about anything. I’m thinking about smothering a chicken breast with it for dinner – but my favorite way to use it is to dollop it onto a crostini that has been pan-sauteed in butter.

So run , don’t walk, to your nearest grocery (or better yet, Farmer’s Market)… buy a large batch of kale (curly, flat, rainbow – it doesn’t matter)… a good size lemon (Meyer lemons if you can find them!) and some fresh garlic and make enough to eat all week!  Keep in mind that the shelf-life for this pesto is about a week. Read the Perfect Health section below below to see why you want to incorporate kale into as many meals as you can.

Ingredients
4-6 cups (about 6.5 ounces) kale leaves, ribs removed, coarsely chopped
2-3 large fresh garlic cloves, smashed and coarsely chopped
3/4 cup coarsely chopped, toasted walnuts (raw is fine but toasting brings out their nuttiness)
3/4 cup Parmesan (or Vegan Parmesan)
1/3 cup olive oil (for extra walnut taste mix with 1 part walnut oil)
1 tablespoon lemon zest
1/2 teaspoon course sea salt
freshly ground black pepper to taste

Preparation
Remove ribs from kale and give it a rough chop. In a large pot, bring water to a boil with a couple of pinches of salt. Prepare a large boil of ice water and set aside. Once water in boiling, add kale for about 1 minute. Your kale will start to turn a brighter green. Remove from kale pot and immediately put in ice water. This is called blanching and is what helps give (and keep) your kale a bright green. Remove kale from ice water after 1 minute and pat dry.

Peel and roughly chop two large bulbs of garlic. If you are using pre-minced garlic, this is roughly 2 tablespoons.

If you are roasting your walnuts, place then in a dry saute pan over medium heat. Continue moving them in the pan until you begin to smell their nuttiness. It should take about 2 minutes.  Keep an eye on them – they burn easily (which is why I don’t put them in the oven anymore – I always forget them!).

Ready to Make?
In a food processor, add the kale, garlic, Parmesan and walnuts. Pulse 6-7  times until it’s well-combined. Slowly, through the feed tube, drizzle the oil until mixture is moist and holds together. Remove lid and zest your lemon directly into mixture. Zest, and not juice, makes all the difference here. It’s sweet and tangy and every once in a while you’ll get a burst of it in your mouth. So delish.  But feel free to add a little juice for extra lemony flavor. Now add salt and pepper, return lid and pulse a couple of more times. NOTE: It’s important to use the pulse feature and not let your processor run… you want to retain some of the leafy texture of the kale and not make mush. I may or may not be speaking from experience.

Taste and adjust seasonings if necessary. And presto you have pesto!

The Perfect Bite
Whenever making a dip or spread or something that is not meant to be eaten on its own… it’s important to taste-test it once just with a spoon and then again with what you plan on having it with. On it’s own it may taste like it needs more salt, but if you plan on eating it with salty chips or crackers… it may be fine as it is once combined with it’s dipping partner.

The Perfect Pairing
Since this is a new item to me… I may discover more and more pairing as I go.. so check back regularly.  I’m certain this will be delightful on a crostini and absolutely divine mixed into some whole wheat pasta. Let me know if you try it on something yummy! Enjoy this with a crisp pinot grigio.

The Perfect Health
Kale’s risk-lowering benefits for cancer have recently been extended to at least five different types of cancer. These types include cancer of the bladder, breast, colon, ovary, and prostate. Isothiocyanates (ITCs) made from glucosinolates in kale play a primary role in achieving these risk-lowering benefits. Read more about the benefits of here.

Vegetarian Spring Rolls w/Peanut Sauce


Once again I am trying to duplicate something from my favorite Thai restaurant, Thai Phooket. But I love Spring Rolls, especially because they’re fresh and healthy and dipped in a sauce made from peanut butter and Asian spices! Um hello… speaking my language here.

I stumbled across the rice paper wrappers at Nashville’s downtown International Market. So I thought I’d give it a shot. After some online research (Have you checked out TasteSpotting?) I set out to wrap some veggie Spring Rolls.

Let me emphasize here how important it is to establish your mise en place. This process goes quickly once you start rolling the rice paper… so, as always, I suggest reading through the entire recipe before beginning. Once all your veggies and herbs are chopped and ready, make your peanut sauce… since spring rolls are best eaten immediately after being assembled. And you don’t want them sitting around getting soggy while making your sauce.

Ingredients

Carrots
Yellow bell peppers
Green onions
Cilantro leaves
Avocado strips
Bean sprouts
Cucumber
Avocado
(all veg sliced julienne in the slimmest cut you can manage. Quantities vary based on how thick you want your rolls to be. I suggest 1.5-2″ around.)
Rice paper wrappers
Fresh basil, mint and cilantro leaves – chiffonade cut

Peanut Dipping Sauce
1 clove garlic, minced
3 tbs. rice vinegar
1/2 c. Tamari soy sauce
1-2 tbs. Siracha chili sauce (really however much or little you want)
1/2 c. peanut butter
juice of one lime
2 tbs. sesame oil

Preparation
Julienne all of your veggies in long 2-3″ strips
Roll herb leaves together and slice into a chiffonade and set aside.
Get a fry pan or deep plate that’s at least 12″ across. Fill with warm (not hot) water. You will use this to soak your rice paper wrappers.


Ready to Cook (or rather, assemble)?

For the Peanut Sauce:
Put all sauce ingredients into a food processor and blend until smooth. It should be creamy but not too runny. Be sure to taste and adjust accordingly. I like it spicier, you may like it more nutty.
For Spring Rolls:
Soak your rice paper sheets in the pan of warm water for roughly 15 seconds.
Begin layering your veggies and sprinkling the chiffonade of herbs across the veg. Once all your ingredients are stacked lengthwise, fold “burrito style” – i.e., Fold in the top and bottom of the roll, and then fold over one side, and roll tightly towards the other. The wrapper will stick to itself well and hold everything together. If your wrapper is drying and does not seem  to seal tightly, dip your finger in water and paint over all the seams.  Place seam-side down on plate. You can serve these whole (below) or cut in two (above)… which ever you prefer.

The Perfect Bite
Just drizzle a little peanut sauce into the roll and enjoy! TIP: if you spoon the sauce onto the cut roll verses dipping straight into the sauce, your roll will stay together better.

The Perfect Pairing
Yalumba makes an amazing little viognier… which is a white varietal that is similar to chardonnay, but not nearly as oak-y.  Richer in musk and spice it’s a perfect balance for the crisp fresh vegetables in the spring rolls and is smooth enough to ease the heat of the peanut sauce.

The Perfect Health
These little beauties are so healthy! Not only are they packed with nutrients from the vegetables and herbs, but they’re a mere 63 calories per roll (95 calories if you add shrimp). Of course there’s 50 calories per tablespoon of peanut sauce… but it’s so rich it only takes a little. So enjoy!

Buttermilk Onion Rings


I. Love. Onion. Rings.  As a kid, I would order them, crack them open, pull out the onion and and just eat the batter. Though I loved the flavor, I hadn’t quite warmed up to eating the actual onion yet. Now, I love them in EVERYTHING! Especially sweet onions. Vidalia’s, Peruvian, Maui, Walla Walla, Sweet Imperial, Spring/Summer, Fall/Winter… it doesn’t matter. If it’s a sweet onion… I’m a fan.

Most recipes for onion rings are pretty basic. But I’ve added a couple of little extras to make these special. Like buttermilk and Panko and an Asian hot sauce. I hope you love these as much as I do.

Ingredients

ONION RINGS

  • 1 large sweet Vidalia onion, cut into 1/4 inch slices
  • 1 1/4 cups all-purpose flour
  • 1 teaspoon baking powder
  • 1 teaspoon salt
  • 1 egg
  • 1 – 1 1/5 cup buttermilk, or as needed
  • 1 cup dry unflavored bread crumbs
  • 1 cup Panko bread crumbs
  • 1/2 cup corn meal
  • salt to taste
  • 1 quart peanut oil for frying, or as needed (you can sub vegetable oil but peanut tastes better and takes the  high heat better)

DIPPING SAUCE

Preparing Dipping Sauce

Mix two ingredients thoroughly until completely blended. Use more or less of the chili sauce depending on your “heat” preference.

Preparation

  1. Heat the oil in a deep-fryer or dutch oven to 365 degrees F.
  2. Separate the onion slices into rings, and set aside. In a small bowl, stir together the flour, baking powder and salt.
  3. Dip the onion slices into the flour mixture until they are all coated; set aside. This will help the batter adhere.
  4. Gently beat the egg and milk into the flour mixture using hand mixer.
  5. Dip the floured rings into the batter to coat, then place on a wire rack to drain until the batter stops dripping. The wire rack may be placed over a sheet of aluminum foil for easier clean up.
  6. Mix together the corn meal, bread and Panko crumbs and scatter out on a plate or shallow dish. Place rings one at a time into the crumbs, and scooping over the ring to coat it. Give it a gentle tap as you remove it from the crumbs. The coating should cling very well. Repeat with remaining rings.I suggest completing this entire step before starting to fry rings. Its very easy to burn them if you’re distracted. I may or may not be speaking from experience. :o)

Ready To Cook?

  1. Deep fry the rings a few at a time for 2 to 3 minutes, or until golden brown. They should float to the top immediately – if they don’t your oil is not hot enough. Turn rings over once during the frying time.
  2. Remove from oil and transfer to a paper towel to drain. Season with seasoning salt, and serve warm.

The Perfect Bite

Give them about 30 seconds or so to cool.. swirl slightly in the Sriracha Sauce and enjoy! Although they’re best served within minutes of cooking…  be sure to let them cool enough so as not to burn the roof of your mouth. Again, I may or may not be speaking from experience.

The Perfect Pairing

I enjoyed these with a bottle of my favorite beer, Negra Medelo. But any amber or pale ale would be a great pairing. Also, try putting a few of the smaller rings on top of a large summer salad or add one of the large rings to the top of your favorite grilled burger.

The Perfect Health

Okay, let’s face it – these are deep fried onion rings. I’m not going to try and fake a health benefit here. But, onions have a variety of medicinal effects. Early American settlers used wild onions to treat colds, coughs, and asthma, and to repel insects. In Chinese medicine, onions have been used to treat angina, coughs, bacterial infections, and breathing problems. Read here for more details.

Trois Fromages L’oignon Doux Tartlettes


These tasty little tartlettes are the perfect size to just pop in your mouth and enjoy the melted nutty goodness. I love appetizers and little bites… it allows you to try a plethora of options at the app table or from the “starter” menu.

Trois Fromages L’oignon Doux Tartlettes have become quite a party favorite. Last week I showed up with a plate full to an after church get-together… it was a mere 20 feet from the door to the table… but the plate was almost empty by the time I set it down. Better known as “those cheesy onion thingys” among my friends… they are simply three cheeses (Gruyere, Swiss, & Parmesan) and finely diced sweet Vidalia onions baked in tiny filo cups. Voila! You are certain to get the “wow” response from your party guests.

Ingredients
2 cups shredded swiss cheese
1 cup shredded Gruyere (Austrian is the best – but Whole Foods and Trader Joe’s has a great imported selection)
1/2 cup shredded parmigiano reggiano
3 cups diced sweet Vidalia onions
3/4 cup mayonnaise
3 pkgs pre-made Filo cups (15 count)
Ready To Cook?
Preheat oven to 425 degrees.
Add first 5 ingredients to a deep casserole dish. Stir until cheese, onions and mayo are thoroughly mixed. Cover with tin foil and bake for 45 minutes or until onions are tender. Uncover and bake for 10 more minutes… allowing cheese to brown around edges. Remove from oven and let cool for 20 minutes.
Preparation
Line cookie sheets with baking paper. (*tip: baking paper helps items cook more evenly and aids in the non-stick process). Once onion mixture has cooled, use a teaspoon and scoop spoonfuls into the filo cups. Space filo cups up on tray about 1/2 inch a part. Be careful not to place too close or they will stick together. Once cups are all filled, sprinkle the tops with shredded parmesan. Return to over on top rack and bake for 5 minutes until edges turn golden brown.
The Perfect Bite
Make sure you let these little babies cool! I’ve lost count of the times I’ve burned the roof of my mouth, unable to control my urge to pop one in my mouth right out of the oven! Once cooled, eat whole. Sure, if you’re dainty… try and take a little “bite” but you’ll end up wearing most of it.
The Perfect Pairing
This is an appetizer… so “pairing” it has no limits! They’re great for anything from a Game Day snack to an appetizer for a French inspired meal. To compliment the nuttiness of the Gruyere and Parmesan taste, pair this snack with a Yazoo Dos Perros. This toasty amber ale is a descendant of old Austrian styles known for blending German, English and chocolate malts.
Did You Know?
Onions are low in calories, zero fat or cholesterol, and when it comes to cutting Vidalias – you can almost get away without crying! *Tip: using a really sharp knife will help reduce tears when cutting onions. Also, once an onion becomes even slightly over-ripe… prepare to cry. Read more here for health aspects.

Trois Fromages L’oignon Doux Tartlettes on FoodistaTrois Fromages L’oignon Doux Tartlettes

Roasted Red Bell Pepper Salsa


Just the hint of a warm Spring day in my home here in Nashville brings people out of their Winter hiding and into the brilliant sunshine. On a beautiful day such as today, you’ll spot people gathering on front porches or in backyards, passing around a plateful of some beloved family recipe or sharing a favorite beverage. I may have romanticized this a bit, but Spring and Summer will do that to a girl.

One of my favorite summer-time treats is a healthy bowl of my homemade salsa… not just because it’s chock full of fresh ingredients like cilantro, summer tomatoes, spicy jalapeño peppers and sweet Vidalia onions. But because it’s a social dish. I served this just last night at a grill-out and it became the ‘watering hole’… where everyone gathered to scoop chip-fulls of chunky goodness as they caught up on each others lives. This particular recipe has a couple of unusual ingredients for salsa… a touch of Indian curry for heat and roasted red bell peppers for sweet. If you keep some of these ingredients on-hand… it’s a quick and easy way to bring people together and keep them coming back.

Ingredients
1 large can of Red Gold Whole Peeled Tomatoes (*or 10-12 fresh Roma tomatoes quartered and roasted – follow directions for fresh bell peppers below)
1 large sweet Vidalia onion – quartered
*1 jar sweet roasted red bell peppers (include about 1/2 the juice from the jar)

4 cloves of garlic
1/2 cup of cilantro leaves (remove stems)
2-3 jalapeño peppers – remove seeds and quarter
1 tablespoon Patak’s Hot Curry Paste (hopefully still in your fridge from making my curry hummus recipe!)
Salt & pepper to taste
Garden of Eatin’ Blue Corn Chips (or any bag of your favorite corn chips)

* feel free to roast your own bell peppers. Just cut in half, remove seeds and stem, drizzle with olive oil, sprinkle with sea salt and roast on top oven rack at 400 degrees for 20 minutes. You’ll know they’re done when your whole house smells AMAZING! TIP: to easily remove skins, immediately place piping hot peppers in a bowl and cover with saran wrap. Let steam (and cool) for 10 minutes and the skins will just peel right off!

Preparation
In a food processor or blender, add whole peeled tomatoes (discard juice from can), and all remaining ingredients. Pulse the food processor or blender but don’t let it run or you’ll puree the salsa and you’ll lose the chunkiness. Taste the salsa (always taste your food before serving!) and add additional salt, pepper or curry paste if needed.

The Perfect Bite
I use the Garden of Eatin Blue Corn chips, but any chip with good scooping power will work. For added yummy-ness, dice a semi-ripe avocado and sprinkle across top of salsa. Scoop up a bite and enjoy. This salsa is also great as a topping on your burger or on grilled fish and chicken.

The Perfect Pairing
Now, normally you’d never catch me recommending a boxed wine… but I’ve recently discovered Bota Box wines… and their Pinto Grigio is quite tasty. Since you’ll probably be entertaining with all this salsa… you’ll need a Bota Box (contains 4 bottles and runs $16-$20 depending on where you purchase) to satisfy the masses. Refrigerate white boxed wine over night to achieve a good tasting temperature.

Did You Know?
Jarred salsas are very high in sodium. Manufacturers have to guarantee a shelf life and use tons of preservatives. Making your own salsa lets you control the salt. I’m a big fan using plenty of flavorful spices so very little salt is necessary. And if you make it tasty enough – it will be gobbled up and it won’t need a shelf life! For even less sodium, make this recipe using fresh tomatoes cut into 1/4 inch squares. A Handy Tip: If you use rubber gloves to cut and de-seed jalapeños you’ll avoid the Diablo Rojo fiasco. The seeds are the hottest part of the chile and if you can handle, add quite a bit of heat to your salsa. Enjoy!

Curry Hummus & Naan Bread


Hummus is a popular condiment in the Middle East and in the Far East… and is usually eaten with a some form of flat bread.

But this is not your ordinary hummus… and to quote my friends Mahesh & Parvathi from India… “Deb, you need to get a patent for this!”

I love the flavors of India… rich in spices like curry, cardamom, cumin (Jeera), paprika, coriander and turmeric. So, I wanted to create a hummus that was rich in Indian flavors… rich enough to be eaten just with naan bread on its own… combining spices that provide heat and sweet simultaneously.

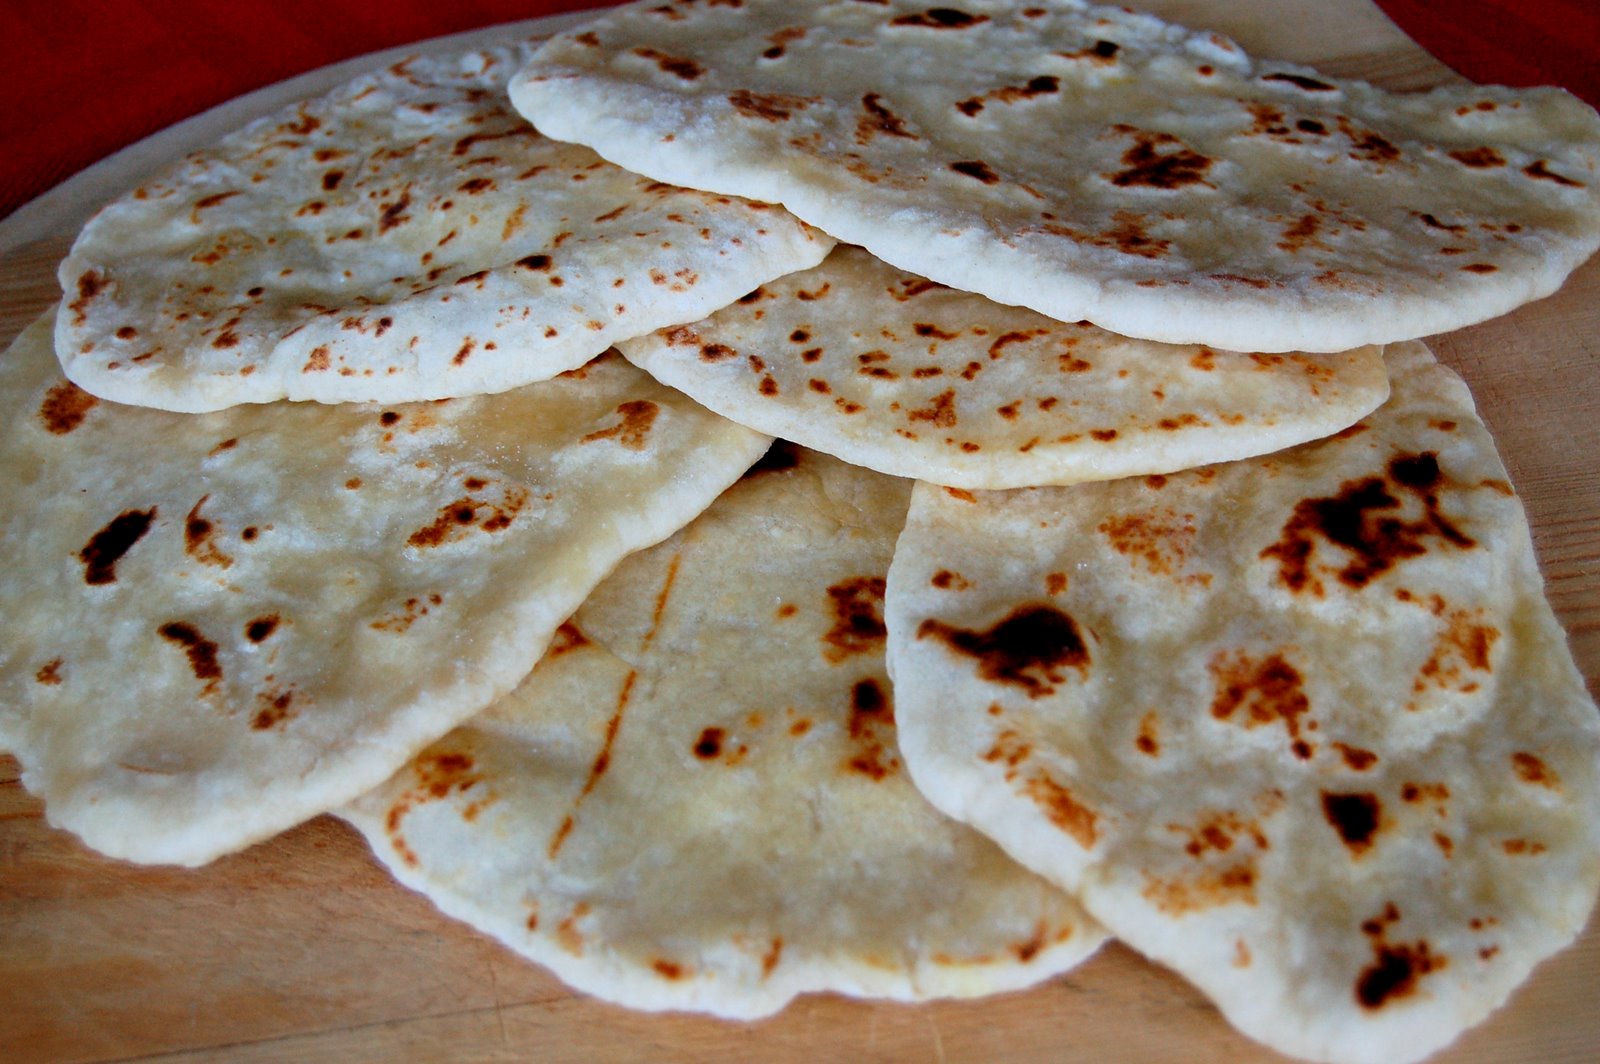
Below are the recipes for both my Curry Hummus and homemade Naan. If you’re crunched for time, Trader Joe’s carries Naan bread in both the fresh bread section as well as the frozen food section. Both are quite tasty. But, seriously…. there is nothing like the taste of homemade Naan, fresh out of the oven. Plus, I love watching each bread round puff into a little naan pillow just before settling into its flat bread state. Pure entertainment to a foodie such as I…

Hummus Ingredients

2 12 oz cans chickpeas – drained
3 garlic cloves crushed
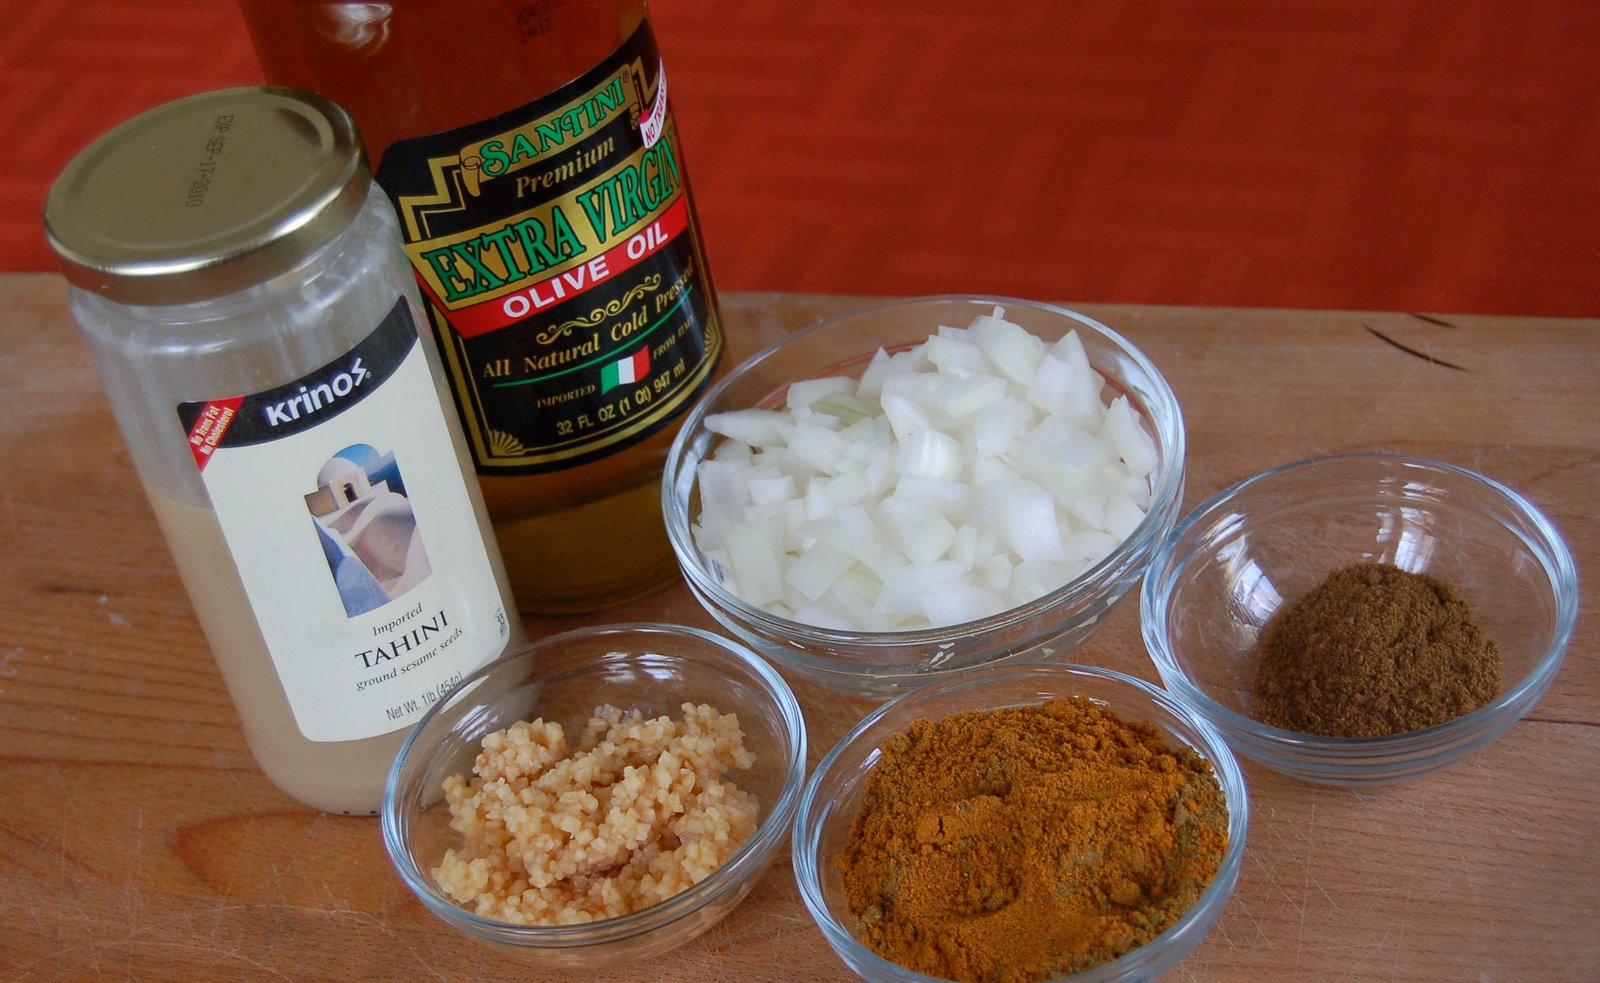
2 tbs Tahini (pictured below)
1 tsp ground cumin
1 sweet onion – chopped
3 tsp yellow curry powder or 1 tsp of yellow curry paste (I find this at the International Market – Nashville has a great one in the downtown Farmer’s Market)
1 tsp paprika
4-5 tbs olive oil – divided
1 tablespoon Patak’s Hot Curry Paste (pictured – use mild if you are not a fan of spicy food).
salt & pepper to taste

Preparation
Bring a saucepan of water to boil – add chickpeas and reduce to simmer for 20 minutes. Meanwhile, sauté onion and garlic in 1-2 tbs of olive oil until softened. Add cumin, curry powder and hot curry paste, and another 2 tbs of olive oil. Continue to sauté until onions are translucent. Mixture will be yellowish-brown. Blend softened chickpeas and Tahini in food processor, adding onion & garlic mixture until thoroughly blended. Add additional olive oil until desired consistency. Give it a taste and add salt & pepper if necessary.

When mixture is creamy (but not runny, more like the consistency of mashed potatoes)) transfer to serving dish – drizzle with olive oil and sprinkle with paprika.

Naan Ingredients
4 cups flour
1 teaspoon baking powder
1 teaspoon salt
2 cups plain non-dairy yogurt

Preperations
Mix together flour, baking powder and salt. Stir in the yogurt till the dough is too stiff for a spoon, then knead it in the bowl till it holds together well, adding more flour if necessary.

Turn it out on a floured surface and continue kneading for about 5 minutes till the dough feels smooth and elastic. Form the dough into a ball and put it in an oiled bowl, covered with a towel, to rest for an hour or longer.

Take the dough out and cut it into 10 equal pieces. Form each into a ball and press the balls flat into round discs.

Heat a large frying pan or griddle, either seasoned cast iron or a good non-stick finish. Heat your oven to 500 degrees. Take 1 piece of dough at a time and roll it out on a floured surface till it is about 8-10 inches across and less than 1/4 inch thick. Lay it on the hot griddle and cook it over a medium heat for 4-5 minutes. It will puff up in places or all over, and there will be some brown spots on each side as you flip it. Slide a spatula under the naan and transfer it to the oven, directly onto the rack, for a minute or two, just till it finishes puffing up into a balloon and begins to color lightly on top. Remove naan from the oven and brush it lightly with melted vegan butter or olive oil.


Serve the breads hot, fresh from the oven, or let them cool and wrap them up.
To reheat, wrap them in aluminum foil, in packets of 4 or 5 breads and put them in a 400 degree oven for 10-15 minutes.

The Perfect Bite
Scoop warm Naan bread into the hummus and enjoy! The hummus is also quite tasty on chicken or with raw or roasted veggies. Also, try it as a spread on a burger or sandwich instead of mayo.

The Perfect Pairing
To keep with the Indian theme… try an IPA (Indian Pale Ale). Or try a white blend by Hayman & Hill Interchange. Hailed as a perfect blend to accompany Indian food… thanks to its creamy and fruity aromas that offset the rich spicy flavors of the curry hummus. Enjoy!

Did You Know?
Curry has a multitude of health benefits including aiding in the prevention of Alzheimers Disease.