Muffin Mania


I went a little crazy this weekend… call it Easter-inspired or bad-weather-I’m-stuck-indoors-inspired… but I’ve been baking muffins. Lots and lots of muffins. Below are my four favorites: Tuscon Lemon Muffin (with my homemade ricotta and olive oil); Key Lime Zest Muffin; Dark Cocoa Muffin; and Bacon Cheddar & Jalapeno Corn Muffin. All four were adapted from this month’s Cooking Light Magazine, with small tweaks of my own.

Instead of doing four separate entries I’ll just list the recipe under each photo.

Tuscan Lemon Muffin
Ingredients
1 3/4 cup all-purpose flour
3/4 cup granulated sugar
2 1/2 tsp baking powder
1/4 tsp salt
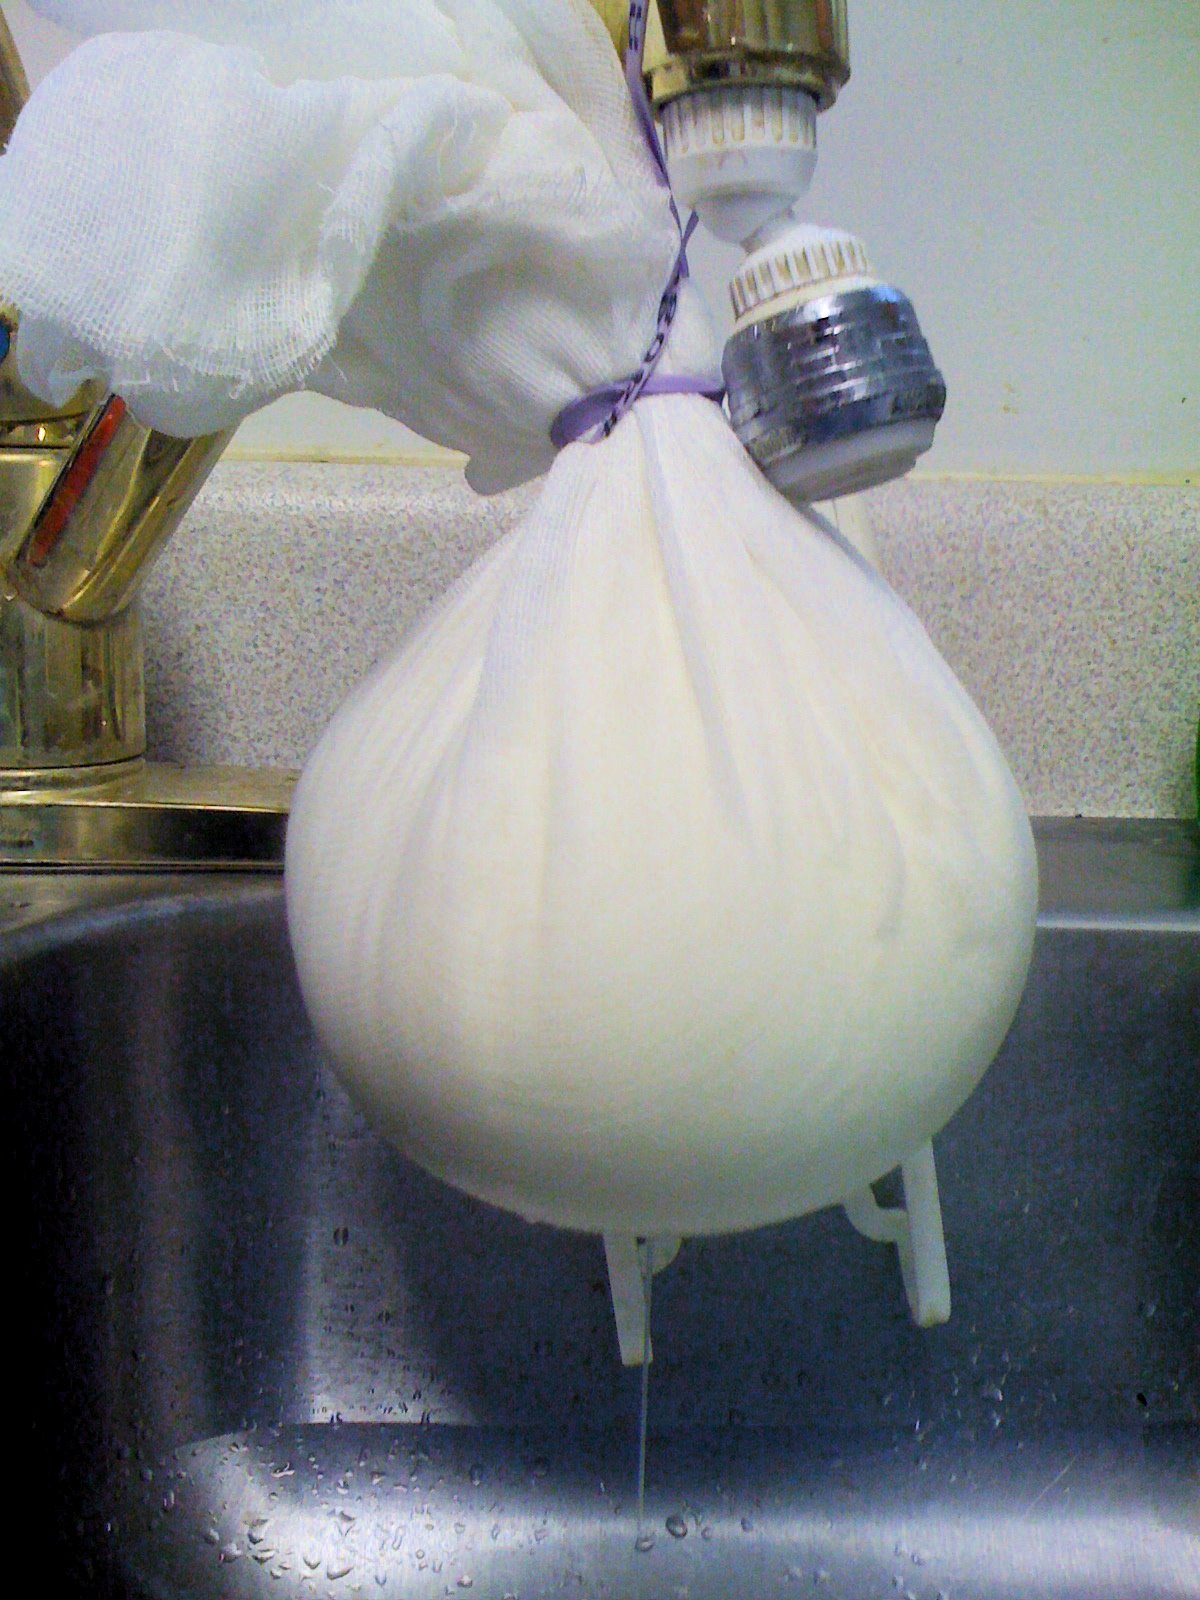
3/4 cup low-fat or part-skim ricotta (best with homemade)
1/2 cup water
1/4 cup extra virgin olive oil
2 tablespoons fresh lemon zest (roughly one large lemon)
2 tablespoons fresh lemon juice (half of one large lemon)
1 large egg, lightly beaten
2-3 tablespoons turbinado sugar

Items Needed
12 muffin cup liners
Cooking Spray
Non-stick muffin pan

Ready To Cook?
Preheat over to 375º
Combine first four ingredients (through salt) in a large bowl and create a well in the center. In a separate bowl combine ricotta and remaining ingredients through egg. Pour mixture into the well and stir gently just until moist.

Place muffin cup liners into pan and coat with cooking spray. Divide batter evenly between cups. Using a small ice cream scooper will help you evenly distribute batter and makes for a neater process. Sprinkle turbinado sugar over top of batter.

Bake at 375º for 16 minutes or until a wooden tooth pick inserted into the center comes out clean. Cool for 5 minutes.

Calories 186; Fat 6.2g; Protein 4g; Carb 29.5g; Fiber 0.6g; Chol 21mg; Iron 1mg; Sodium 160mg; Calc 81mg

Key Lime Zest Muffin

Ingredients
1 3/4 cup all-purpose flour
3/4 cup granulated sugar
2 1/2 tsp baking powder
1/4 tsp salt
3/4 cup low-fat whipped cream cheese
1/2 cup water
1/4 cup vegetable oil
2 tablespoons fresh lime zest (roughly three small-medium limes)
2 tablespoons fresh lime juice (roughly 2 limes)
1 large egg, lightly beaten
2-3 tablespoons turbinado sugar
1 tablespoon fresh lime zest for topping

Items Needed
12 muffin cup liners
Cooking Spray
Non-stick muffin pan

Ready To Cook?
Preheat over to 375º
Combine first four ingredients (through salt) in a large bowl and create a well in the center. In a separate bowl combine cream cheese and remaining ingredients through egg. Pour mixture into the well and stir gently just until moist.

Place muffin cup liners into pan and coat with cooking spray. Divide batter evenly between cups. Using a small ice cream scooper will help you evenly distribute batter and makes for a neater process. Sprinkle (or directly zest using a plane) remaining lime zest and turbinado sugar over top of batter.

Bake at 375º for 16 minutes or until a wooden tooth pick inserted into the center comes out clean. Cool for 5 minutes.

Calories 186; Fat 6.2g; Protein 4g; Carb 29.5g; Fiber 0.6g; Chol 21mg; Iron 1mg; Sodium 160mg; Calc 81mg

Dark Cocoa Muffin

Ingredients
1 3/4 cup all=purpose flour
1/2 cup packed brown sugar
1/4 cup unsweetened cocoa powder
1 teaspoon baking powder
1 teaspoon baking soda
1/4 teaspoon salt
1 cup warm water
1/4 cup vegetable oil
1 tablespoon red wine vinegar
1 tablespoon vanilla extract
1 large egg, lightly beaten
3/4 cup dark chocolate mini-chips, divided

Items Needed
12 muffin cup liners
Cooking Spray
Non-stick muffin pan

Ready To Cook?
Preheat oven to 400º
Combine first six ingredients (through salt) in a large bowl stirring with a whisk. Create a well in the center of mixture. In a separate bowl combine remaining ingredients through egg. Pour mixture into the well and stir gently just until moist. Fold in chocolate chips until mixed evenly into batter.

Place muffin cup liners into pan and coat with cooking spray. Divide batter evenly between cups. Using a small ice cream scooper will help you evenly distribute batter and makes for a neater process. Sprinkle remaining and chocolate chips on top of batter.

Bake at 400º for 15 minutes or until a wooden tooth pick inserted into the center comes out clean. Cool for 5 minutes.

Calories 191; Fat 7.6g; Protein 3.1g; Carb 29g; Fiber 1.5g; Chol 15mg; Iron 1.5mg; Sodium 197mg; Calc 37mg

Bacon Cheddar & Jalapeno Corn Muffin

Ingredients
1 cup all-purpose flour
3/4 cup yellow cornmeal
1/2 cup shredded sharp cheddar cheese
2 tablespoons granulated sugar
1 teaspoon baking powder
1 teaspoon baking soda
1/2 teaspoon ground cumin
1/4 teaspoon salt
4 center-cut bacon slices, cooked, drained and crumbled
1 jalapeno pepper, seeded and minced
1 `/4 cup low-fat buttermilk
1/4 cup vegetable oil
1 large egg, lightly beaten

Items Needed
12 muffin cup liners
Cooking Spray
Non-stick muffin pan

Ready To Cook?
Preheat over to 375º
Combine first eight ingredients (through salt) in a large bowl stirring with a whisk. Create a well in the center of the bowl. In a separate bowl combine cream cheese and remaining ingredients through egg. Pour mixture into the well and stir gently just until moist.

Place muffin cup liners into pan and coat with cooking spray. Divide batter evenly between cups. Using a small ice cream scooper will help you evenly distribute batter and makes for a neater process.

Bake at 375º for 15 minutes or until a wooden tooth pick inserted into the center comes out clean. Cool for 5 minutes. Serve warm with a pat of butter.

Calories 160; Fat 7.9g; Protein 4.8g; Carb 17.7g; Fiber 0.9g; Chol 23mg; Iron 0.9mg; Sodium 299mg; Calc 89mg

Savory Galettes


Spinach and Smoked Salmon Galette

Zucchini, Prosciutto and Basil Pesto Galette

The beauty of the galette is that it can come in any shape, size and flavor. It’s simply a free-form rustic tart and can be either sweet or savory, or both. My favorite, not pictured here because my friends ate it before I could snap a photo, is fresh fig and goat cheese drizzled with dark honey.

These galettes are made with a “cheater” crust – store bought rolled up in a box. But it worked in a pinch. But use whatever your favorite pie crust recipe is and I’m sure they’ll be delicious and even more rustic looking. Or cheat as I did… whatever works best for you.

On a side note: I just won an ebay auction scoring a 1967 edition of Julia Child’s Mastering the Art of French Cooking. That deserves a blog entry all its own.. but I looked up galettes according to Julia and she made them as small individual appetizer tarts! About 2″ in diameter and often a chunk of (French) cheese served as the base, topped with ham, or an egg or both. Then wrapping the crust around and baking – things of perfection, I’m sure.

So there’s a few extra ideas for you. Listed below are the recipes for the two galettes pictured above. If you try your own version please come back and post it on this blog so we can all benefit from your culinary genius!

Each galette serves 3-6 people depending on whether you are serving it as an entree, a side or an appetizer. TIP:  You’ll notice that both galettes call for homemade ricotta. Please, please, please do me a favor and don’t buy that pasty store-bought stuff. Click on the link provided and you’ll see just how very easy it is to make your own. And once you do – you’ll never eat store-bought again – I promise! Try making the ricotta a day or two before and it won’t feel like such a big job all in one day.  One batch of ricotta should be enough to make roughly three galettes.

Ingredients
Galette #1
1 roll of store-bought pie crust
1 cup homemade ricotta
1 large egg
1 half small sweet onion – finely diced
1.5 cup baby spinach leaves (washed w/stems removed)
3/4 cup smoked sockeye salmon (or whatever your favorite smoked salmon is)
1/4 pine nuts
pinch of fine sea salt
pinch of ground pepper
egg whites for brushing on crust

Galette #2
1 roll of store-bought pie crust
1 cup homemade ricotta
1/2 cup of grated Parmesan cheese – divided
1 large egg
1 tsp of garlic paste or very finely minced garlic
1 tablespoon of pesto
1/2 cup of red bell pepper – julienne
1/2 zucchini slices (roughly 8-10 dials)
1 sheet of prosciutto – sliced into strips lengthwise
pinch of fine sea salt
pinch of ground pepper
egg whites for brushing on crust

Preparation
Galette #1
Line a cookie sheet with parchment paper or spray with non-stick spray. Parchment paper is best because it will help to transfer the galette to a plate later.

Roll out a pie crust onto your work board and use your rolling pin to stretch and smooth it out. This should give you an extra inch of pie crust. Place the crust onto the cookie tin.

In either a stand mixer or using a hand mixer, blend together the ricotta, the egg and diced onion.  Add the salt and pepper. Don’t over-beat… it should look like cottage cheese when you’re done.

Place 1/2 of your spinach leaves in a single layer, forming  circle in the center of your pie crust. You should leave at least 2″ of crust edge showing.  Spoon your blended ricotta and egg mixture on top of the spinach leaves. Spread around with a spatula making an even layer, not exceeding the spinach leaves (as in, still leave 2″ of pie crust available).  Now put another single layer of your remaining spinach leaves on top of the mixture. Then your final layer is the Smoked salmon and pine nuts. Peel salmon into small thin strips and scatter evenly on top of the spinach leaves. Scatter pine nuts across the top.

Gently fold the 2″ crust up and over the layered smoked salmon. It will not cover the whole thing and will leave roughly a 3-4″ whole in the center uncovered (see photo above).  The finished shape will be rustic and rarely the same. Sometimes they’re very round, sometimes more triangle or square. It doesn’t matter… I think the more non-uniform the better.

Brush the outside of the pastry with the egg whites. You can also use melted butter if you prefer.

Galette #2
Line a cookie sheet with parchment paper or spray with non-stick spray. Parchment paper is best because it will help to transfer the galette to a plate later.

Roll out a pie crust onto your work board and use your rolling pin to stretch and smooth it out. This should give you an extra inch of pie crust. Place the crust onto the cookie tin.

In either a stand mixer or using a hand mixer, blend together the ricotta, the egg, garlic, pesto and 1/2 of your Parmesan cheese. Add the salt and pepper. Don’t over-beat… it should look like cottage cheese when you’re done.

Spoon your blended ricotta, pesto and egg mixture forming a circle in the center of your pie crust. You should leave at least 2″ of crust edge showing. Spread around with a spatula making an even layer. Now put a single layer of of the prosciutto strips on top of the mixture. Then scatter the red bell pepper strips as the next layer. You can be neat or haphazard it’s up to you. Then layer your thin zucchini slices, starting from the outside and working your way to the middle in a circular pattern. Sprinkle the top with the remaining Parmesan cheese.

Gently fold the 2″ crust up and over the layered zucchini. As mentioned before, it will not cover the whole thing and will leave roughly a 3-4″ whole in the center uncovered (see photo above). It’s okay of the hole is larger, as long as there’s a good lip of crust to keep in the ingredients.

Brush the outside of the pastry with the egg whites or use melted butter if you prefer.

Ready to Cook?
Place galette in a 375 degree preheated oven, on the middle rack for 25 minutes or until your pie crust is golden brown. On galette #1 the pine nuts should be lightly toasted. If they blacken, your oven rack it too high. On galette #2 the zucchini should be lightly browned and caramelized. Let sit for 10 minutes before serving, but serve warm.

The Perfect Bite
Cut the galette in triangles and eat just like a pizza. Take a nice big bite to be sure and get a taste of all the ingredients!

The Perfect Pairing
Serve by itself or with a lightly dressed side salad. If serving as brunch they go great with mimosas. To make mimosas simply mix 1-2-1 pulp-free orange juice with a sparkling wine such as Barefoot Pinot Grigio Champagne.

The Perfect Health
Did you know that smoked salmon is recommended By The American Heart Association? Smoked salmon is also high in Vitamin E, which is also a great antioxidant. Vitamin E can reduce or lower the risk of heart disease and has also been shown to play a protective role against cancer as well. Read more HERE.

Roasted Beefsteak Tomato & Sweet Basil Pasta Sauce


I recently was given 12 large beefsteak tomatoes. Never wanting to refuse such a beautiful gift, I gladly accepted. Until I realized that I had no idea what to do with them and would never be able to consume them before they went bad. So I started scrambling through recipes and kept coming across a myriad of tomato and pasta sauces.  It seems that everyone has “the perfect” homemade recipe!

As much as I hate to admit this… I’ve never tried making my own sauce. And I have to admit that I feel like I’m cheating when I unscrew the pressurized lid of the Ragu jar and hear that familiar pop… and hoping my dinner guests in the other room don’t notice.

So, it’s high time I learned a thing or two about tomato sauce. I am learning that the “takes all day to make” sauce is truly the best kind… but for a quick and easy, and first attempt… I took the short route.

Of course, every recipe I found said that beefsteak tomatoes are not good for sauce… they’re “too acidic” and “too pulpy”. That I should use rich red Roma tomatoes. But never say die… I can make this work! After all, I don’t have Roma tomatoes. I have 12 very large, very ripe, very meaty “maters” that need to become something fast!

I wanted to make a sauce that was completely natural with *no “cans” or “jars” of anything. And I love roasted vegetables… so I decided that roasting the tomatoes would bring a smoky sweetness out of them, and help cut their acidity.

Ingredients (makes 2 quarts)
1 dozen med-large beefsteak tomatoes (or on the vine red tomatoes)
1 large sweet Vidalia onion
6 large garlic cloves
2 Anaheim chilies (seeded)
3/4 cup fresh basil – torn small
1 tablespoon dried oregano
1 tablespoon dried thyme
2 bay leaves
1/2 cup dry red wine
1/2 cup sherry
2 tablespoons anchovy paste (omit if vegan or vegetarian)
*2 tablespoons tomato paste (if you are making this in the tomato off-season you may need to add tomato paste to enrich the tomato flavor. But if making July-Sept you should be fine without – just taste and decide!)
1 tsp of sugar (to taste)
2 tablespoons extra virgin olive oil

Cut veggies into large chucks and toss onto a baking sheet that has at least a 1″ rim. Sprinkle in the dried thyme and oregano. Drizzle extra virgin olive oil across it and toss to coat. Put on top rack of preheated oven at 400 degrees. Roast veggies and spices for about 20 minutes until tender and just start to brown at edges and the skins on the tomatoes burst.

IMG_5213.JPG
Remove tray from oven and scoop vegetables into a large food processor or blender. Or place them straight into the stock pot if you have an immersion blender. Then you can mix it right in the pot. Add 1/2 cup of fresh sweet basil leaves and blend. Once you’ve brought it to a smooth consistency pour it back into the pot. Add the wine, sherry and anchovy paste and let it simmer on low heat for 30-40 minutes until it reaches desired thickening and taste. Add remaining chopped fresh basil right before serving.

TIPS:

1) Be sure to pour all the juices from the roasting tray into the blender as well – so much flavor there! If your sauce seems a little thin initially – keep simmering, it should reduce nicely.

2) If you’re having trouble getting your sauce blended well, try straining it to get the little pieces of tomato skin and seeds out. Just keep in mind that these textures are a sign of a homemade sauce and not one that’s been processed to death.

Keep In Mind: Due to the orange-red color of the beefsteak tomato, your sauce is not going to be a deep, rich red as you see in many of the store-bought brands (of course, they also use “enhancements”). If you prefer a more red hue, use peeled Roma tomatoes (or add a few for color). You can also add roasted red bell pepper… which will also add a spicy-sweet note to your sauce.

The Perfect Bite
Seriously, it’s a sauce. You’re gonna have to give me some grace on this one. But do dip a piece of crunchy toast to taste while cooking!


The Perfect Pairing
As you can see in the top photo, I paired this sauce with my homemade ricotta and topped it all on a bed of Fusili pasta (not homemade – yet). I also included some basil from my garden.

I asked my friends at Rumours East for a wine recommendation from their wine list… and here’s what they suggested (be sure to catch their 2 for 1 nights, wine tastings & art shows!):

2006 Villa di Azzano Refosco dal Penduncolo Rosso

“It’s typically a given that Italian foods are paired better with Italian wines, and there is no exception in this case. It’s a full-bodied red, rich and fruitful with hints of plum and almond notes. It delivers a strong, yet not overwhelming acidity level that would compliment the flavor of a homemade red tomato sauce. A good rule of thumb when pairing food and wine is not to overwhelm your taste buds by pairing contrasting acidity levels.

If you can’t get your hands on an exact bottle you are looking for, I would recommend a Zinfandel or a Chianti/Sangiovese. Zinfandels are known to be quite versatile and work well with traditional Italian dishes centered around the tomato.”

The Perfect Health
Typical jars of pasta sauce contain very high amounts of corn syrup (some as high as 25 grams of sugars, per cup!) and preservatives (avg 1100 mg of sodium, per cup!). Most pasta sauce recipes call for using a 6oz can of tomato paste (for thickening)… which still has 21 grams of sugar in it!

Making your own sauce, completely from scratch… makes a significant difference in your sodium & sugar intake. Just using fresh, natural products makes the taste unbelievable too! Per cup, a homemade pasta sauce similar to my above recipe will roughly garner a mere 10 grams of sugars and only 26 mg of sodium! Knowing that’s gonna make it hard to buy ever again.

La Bella Burger


This spicy Italian burger, oozing creamy mozzarella from every bite with bursts of sweet roasted red peppers and tangy pesto sauce… is an all-time crowd pleaser. I served all 3 of the international burgers (from recipes shown on this site) on 4th of July this year… and this was voted the favorite of the night. This burger is probably the most time intensive of all the ones I do… but completely worth the effort.

Ingredients
1 lb ground turkey – dark meat if possible (does not dry out as bad)
1 lb sweet Italian turkey sausage (usually found in links)
1 egg
1 tbsp fresh garlic
1 tbsp finely chopped dry oregano
1 cup finely chopped fresh basil (divided – use 1 tbsp for meat mixture)
1 tbsp finely chopped dry thyme
1 tbsp finely chopped fresh rosemary
1 tbsp extra virgin olive oil
1 tsp salt
1/2 pepper
8oz fresh mozzarella
1 sliced red bell pepper
1 cup spinach leaves (remove stems)
4 sourdough baker’s roll
Pesto Sauce
finely chopped fresh basil (remaining cup)
3-4 tbsp extra virgin olive oil
2 tbsp pine nuts – toasted
1 tbsp mayonnaise
1/4 tsp salt
a pinch of black pepper

Preparation
Mix first 8 ingredients together thoroughly… then add salt & pepper and olive oil. Turkey meat has a tendency to dry out quickly on the grill, so the olive oil will help maintain a tender, moist burger.

Form 8 thin patties with the meat mixture. Cut mozzarella cheese into 1/4 inch pieces. On top of one patty, scatter 4-5 mozzarella pieces throughout the center of the meat… leaving a little space between each cube. Be careful not to put cheese too close to the edges or it will leak out during grilling. Place another patty on top and seal edges together until cheese is completely buried.

Cut off the top of the red bell pepper and remove seeds and core. Then slice into 1/4″ rings and brush lightly with olive oil.

Pesto Sauce
In a dry frying pan, quickly toast the pine nuts. Should take less than 3 minutes. In a food processor, pulse basil leaves, toasted pine nuts and salt & pepper…. simultaneously adding olive oil through the feed tube. Once good puree is achieved, add the mayo and pulse 2-3 more times, scraping sides to make sure it’s thoroughly mixed. Don’t leave the processor on or the mixture will be too fine. You want some texture in order to taste each ingredient.

Ready To Cook?
Cook burgers meat over medium heat. Be sure to coat grill with non-stick spray. Cook about 8-10 minutes on each side (varies based on your grill – mine is slow). Keep in mind that turkey burger and turkey sausage will look different than beef or pork… and the sausage lends a reddish color, which can be mistaken for rare meat. Cook on the high end of 12 minutes if you want to be safe… though be careful not to cook too long or your burger will dry out. Try not to flip the burger too often as it tends to crumble. If the mozzarella starts to ooze out, don’t worry… that’s a sign that your burger is almost done.

Please red pepper rings on the upper or outer edges of grill. Cook 3-4 minutes on each side. Brush olive oil on the insides of both halves of the sourdough buns and also place on the upper or outer edges of grill. Remove when lightly toasted.

Spread pesto sauce on top & bottom bun. place spinach leaves on bottom bun and place meat on top of spinach leaves. Garnish top of meat with grilled red bell pepper, fold the halves together and you have La Bella Burger!

The Perfect Bite
I think the perfect bite here… is the first bite. The unexpected burst of hidden mozzarella cheese and spicy sausage leaves most people exclaiming, “Oh my gosh – what’s in this?!”. But it’s a burger… so every bite will be perfect. Reserve extra Pesto sauce for dipping your burger… and anything else you can find – dip away!

The Perfect Pairing
A pasta side might seem an obvious choice for an Italian burger, but that’s probably going to be too heavy. A green salad with Italian dressing would set this off perfect… try this salad. And you probably think I’m going to suggest a red wine… well, you’re right! I just got a bottle of a California Cabernet from Napa Valley called Avalon. But be sure to get the 2006 vintage – 2005 has gotten horrible reviews. A bad year for the folks at Avalon, I suppose. A bottle normally runs in the $12-$14 range… but on sale now 3 for $21.99 at Main Street Liquor in East Nashville! See it pays to live here on the Eastside…

Did You Know?
What is Extra Virgin Olive Oil and how can something be Extra Virgin? Someone had to ask, right?

Extra virgin – considered the best, least processed, comprising the oil from the first pressing of the olives.
Virgin – from the second pressing.
Pure – undergoes some processing, such as filtering and refining.
Extra light – undergoes considerable processing and only retains a very mild olive flavor.

Why cook with olive oil versus Canola oil? Canola oil is a relatively recent development and the original crops were unfit for human consumption due to their high content of a dangerous fatty acid called euric acid. Canola marketers advertise that their oil has less fat content… however, they fail to mention that when heated (which is what happens when you cook.. hello) the oil tends to transition into dangerous trans fatty acids. Ahem. We don’t want that. Read here for more details.

Make My Own Cheese? What? Ricotta from Scratch


It’s an amazing thing to make your own cheese. It makes me feel like I’m really making something… not just opening a package or a can… but making food. It’s a thing of wonder.

Also… I was surprised at how absolutely simple this is – and trust me… once you get this down… you will impress your friends.

The recipe below is a lower fat version of ricotta… which means it yields less volume than the full fat version. But it will make about 2.5-3 cups. Be sure to plan on using it right away. It will only last (in the fridge) for a few days because it isn’t packed full of preservatives like your store brand… and you will certainly taste the difference! It’s really hard for me to buy it off the shelf now. TIP: The fresher the milk the longer the shelf life of the cheese. Keep in air tight container.


Ingredients
1 Gal 2% milk
5 cups low-fat buttermilk
3/4 tsp of fine sea salt

Equipment Needed
Large soup pot
cheese cloth (4-5 layers)
candy thermometer

Preparations
Pour both milks into stock pot and turn to medium heat. Continue cooking until it reaches 170 degrees. Should be 15-20 minutes. gently stir every 5 minutes or so. Be careful not to stir too vigorously or curds will not form.

When the milks reach 170 degrees, curds will have formed at the top. Using a large slotted spoon, gently remove curds (aka milk solids) and place into a cheese cloth-covered strainer and bowl. Let cheese drain in bowl for about 5 minutes. Then, taking the 4 corners of the cloth and bringing them together, rubber band or tie them up… and hang from kitchen faucet. Let drain about 15 minutes. TIP: Don’t toss that whey (the leftover liquids after scooping out the curds)! It is packed with protein – great for smoothies and cooking oatmeal.  You can also cook starches with it (rice, polenta, potatoes). And try watering your tomato plants or other planted veggies and herbs – they will grow like crazy!)

Carefully open the cheese cloth and scrap the fresh ricotta into a mixing bowl. It will be more textured than you’re used to seeing, if you normally have store bought. It should have the consistency of cottage cheese. It will firm up more in the fridge.

Gently stir the sea salt in until throughly mixed. Taste and add more if necessary.

Voila! You have ricotta cheese! Congratulations…

The Perfect Bite
We tasted it straight out of the bowl… while it was still warm… and salty… and tangy… and sweet… and it was probably our favorite thing ever.

The Perfect Pairing
My friend Michele (who acted as Sous Chef on this week’s project) helped me think of all kinds of things to pair this fresh-goodness with. We mixed it with a little homemade salsa and scooped it on a chip. Yep… Delish! We spread the ricotta mousse we’d made for the Zucchini Flutes recipe on a cracker – heaven! We talked about putting it on crustinis and topping with pickled onions or peppers or a tapenade. Can’t wait to try that! Let us know what you come up with… and enjoy!

Did You Know?
Research shows whey protein from dairy foods helps muscle recovery after a bout of exercise. And an easy found source of whey protein can be found in ricotta cheese. More info here.
Ricotta, 1/2 cup (124g) (part skim milk)
Calories: 171
Protein: 14g
Carbohydrate: 6.4g
Total Fat: 10g

Zucchini Flutes Piped with Basil-Ricotta Mousse


This delicious side dish has morphed over the last few times I’ve made it… trial and error play a big part in creating dishes…. at least, when I’m creating dishes. But I believe this one has finally become what just might be something close to perfection. Well close… anyway.

One of the beautiful things about zucchini is the range of sizes they come in… the ones I chose for this recipe were roughly 4-5 inches in length… with the intention of using them as a compliment to an entrée. But, as you will see *later in the recipe… with a few modifications, they can be used as a main dish. Just go to your local Farmer’s Market and grab a few of the big daddies… they can grow to be a full foot long and 2-3 inches in diameter.

Ingredients
(this recipe serves 4 as a **side dish)
2 medium Zucchini
1/4 cup fresh basil leaves – torn
2 tablespoons minced garlic
1 1/2 cup ricotta (use my ricotta recipe for the freshest taste!)
4 tablespoons of shredded Parmesan cheese (divided)
1 tablespoon extra virgin olive oil

Preparations
Preheat oven to 375 degrees.
Zucchini:
Cut stem tips of zucchinis off and discard. Slice lengthwise into two pieces. Take a teaspoon and hollow out each half… scraping away seeds and core until smooth. Be sure to leave about 1/4 inch of flesh or the flute will be too weak. Set on baking tray.

Mousse:
Put the ricotta, basil, garlic, and half of the shredded Parmesan cheese into a food processor and blend until creamy. If too thick… add just a dab of olive oil. But not too much as you need the mousse to stand firm in the zucchini flutes. Once you reach the desired consistency – scoop the mousse out of processor into a zip lock baggie or pastry bag. If using a baggie, snip off about 1/4″ of the corner and squeeze baggie to pipe out mousse into the hollowed section of the zucchini. Stop short of the end by about 1/2″, as the ricotta will expand when baking. Sprinkle remaining Parmesan cheese along the top of flutes.

Ready To Cook?
Put tray of mousse-filled flutes on middle rack of oven, baking for 20 minutes at 375 degrees. Remove when zucchini is tender to a fork and the cheese has browned slightly. Once flutes are removed from the oven, sprinkle a few ricotta crumbles across the top and lightly drizzle with extra virgin olive oil. Serve immediately.

*If you would like to make a large Zucchini Flute your main dish… just add crumbles of cooked sweet Italian Turkey Sausage (for a healthier option than pork) into your mousse puree. Or keep it vegetarian and add your leftover zucchini scrapings to the puree.

**Zucchini Flutes are shown here with an entrée of Bucatoni noodles, marinara and sweet Italian turkey sausage.


The Perfect Bite
These flutes are so tasty on their own, just slice off a bite and enjoy. Be sure to have some extra fresh basil leaves to tear and add to your dish. If serving with pasta and sausage as I did hear… mix it up and stack your fork with it all!

The Perfect Pairing
One of my new favorite (and inexpensive) reds is the Cycles Gladiator Syrah. It’s earthy and bold and has just the kind of aromas that bring out the best in Italian foods.

Did You Know?
One cup of zucchini has about 35 calories and it contains about 340 milligrams of potassium. Zucchini is a good source of fiber with 4 grams per cup. Be sure to include the peel to get all the fiber.