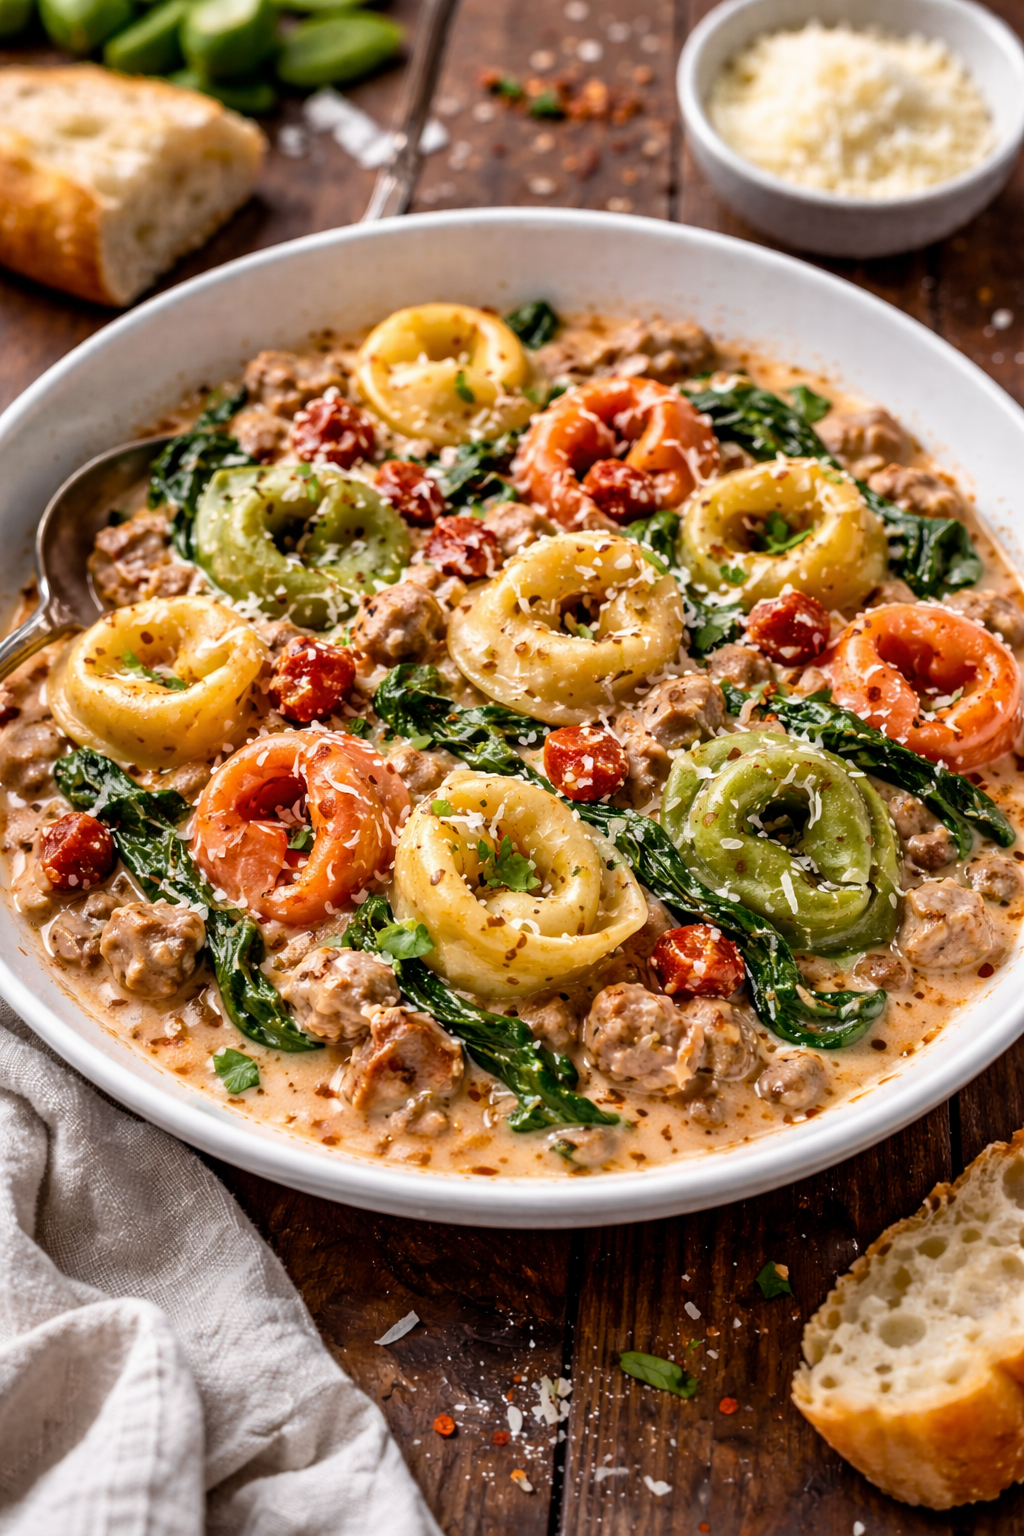
Slow Cooker Moroccan Chicken Tajine


It’s been years since I have made this, but after spending 5 1/2 days without electricity during one of the biggest ice storms Nashville has ever seen… I needed comfort. I got a sudden craving for the warm spices, the tangy lemons, the briny olives, plus the smell of it cooking slowly for hours on end.

This can be adapted for stovetop in a Dutch oven and can be done in roughly an hour. But I wanted low and slow and cooked it for six hours on low in my Crockpot. Now don’t be scared, it’s a lot of ingredients! But you won’t regret it one bit once you have a taste.

INGREDIENTS

  • 6 cloves garlic, peeled and finely chopped
  • 1 teaspoon ground cumin
  • 1 teaspoon ground ginger
  • 1/2 teaspoon sweet paprika
  • 1 teaspoon ground cinnamon
  • 1 teaspoon ground coriander
  • 1 teaspoon ground turmeric
  • 1/2 teaspoon ground cardamom
  • 1 tablespoon kosher or sea salt
  • 1/2 teaspoon freshly ground black pepper
  • 1 large Spanish onion, grated (about 1 cup)
  • 2 tablespoons canola, grapeseed or olive oil (not a heavy olive oil)
  • 1 to 2 preserved lemons, depending on size
  • 8 chicken thighs, with bone and skin
  • Stems from the parsley and cilantro, tied with twine
  • 1/4 teaspoon powdered saffron or 1/4 teaspoon powdered turmeric and 4 strands saffron
  • 1 1/2 cups water
  • 1 can chickpeas, drained
  • 1 cup pitted green Moroccan or Greek olives
  • 1/4 cup cashews
  • 1/2 bunch Italian parsley, about 1/4 cup chopped
  • 1/2 bunch cilantro, about 1/4 cup chopped

PREPARATION

In a large bowl, mix together all the spices, except the saffron, 1/2 cup grated onion, and the oil.

Rinse the preserved lemons and remove the pulp. RESERVE the lemon peel for later use.

Add the lemon pulp to the mixing bowl. Add the chicken. Mix everything together and place in a large plastic bag to marinate overnight in the refrigerator. (Twenty-four hours really gives the chicken the best flavor.)

READY TO COOK?

Heat a frying pan over medium heat, and place the marinated chicken thighs skin down into the pan. Meanwhile, add the remaining onion, drained chickpeas, olives, and cashews to the crockpot. Remove when skin is a golden brown and nestle into the crockpot. Mix the saffron with the water until dissolved and pour into the frying pan to deglaze it and then add to the crockpot (you want all those yummy bits!).

Lastly, slice the remaining preserved lemon peels and scatter throughout the crockpot, and then cut the stems from a bunch of parsley and a bunch of cilantro and bundle with cooking string. Nestle into the crockpot (see photo below). This will make them easier to remove later. Save the leaves for garnishing later.

Cover and set to low for 5-6 hours, or until the thighs are tender. Then remove the chicken to a serving dish and cover with foil to keep warm. You’ll want to remove the skin at this point; it’s not pretty, and it will be rubbery, so it is not needed. *Do not remove before cooking, leaving the skin on helps keep the chicken moist and tender!

While the thighs rest, turn the crockpot to high to reduce the sauce a bit. Once done, serve the chicken with couscous or basmati rice and spoon the sauce over it. Be sure you get preserved lemon, olives, and cashews on each plate! Garnish with chopped cilantro and parsley leaves.

THE PERFECT BITE

Obviously, the perfect bite would be a little of everything! I use a spoon by the way, this is a very scoopable dish! Start with couscous, add chicken and top with an olive, lemon strip and cashew. Enjoy!

THE PERFECT PAIRING(s)

  • Rosé (Best Overall): A chilled dry Rosé, particularly a pale “gris de gris” style, offers high acidity that cuts through the rich, savory, and sweet components of a chicken tajine.
  • Red Wine: Choose light-to-medium-bodied reds to avoid overpowering the chicken. A young, peppery Northern Rhône Syrah or a fruity Grenache/GSM blend works well, as the red fruit notes pair with the spices like cinnamon and cumin.

THE PERFECT HEALTH

Moroccan chicken tajine is a nutrient-dense, antioxidant-rich, and anti-inflammatory dish that promotes heart health, muscle maintenance, and digestive function. Slow-cooked, this meal combines lean protein with fiber-rich vegetables and therapeutic spices like turmeric and ginger to boost immunity, reduce inflammation, and support gut health. 

Cherry Cobbler (aka Dump Cake)


I love this recipe. Not only is it delicious, but it only takes about 5 minutes to assemble and 35 minutes to bake. It is definitely a crowd pleaser! Pro Tip: Let it completely cool before covering it, or the crust will become soggy. And nobody wants that…

INGREDIENTS

  • 2 cans (21-oz ) of cherry pie filling (making sure it says ‘filling’ and not just cherries)
  • 1 box of yellow cake mix
  • 1 stick of salted butter

I used a 9×11″ baking dish (this is an old favorite I found on Etsy, enamel on steel and it cleans up like a dream!). It’s a little smaller than the standard 9×12 and it worked perfectly. But use whatever you have! I do recommend something in this shape and not like a 4-inch deep round casserole dish – you want more surface for the yummy cobbler crust!

READY TO COOK?

Pre-heat your oven to 350 degrees. Keep your butter refrigerated right up until you’re ready to slice it. Pour the 2 cans of cherry pie filling evenly into the dish (see above photo). Then evenly cover that with the dry cake mix,- – yes DRY! Do not mix it with anything. Then thinly slice the butter into pats and place on top of the cake mix (see below).

Set the baking dish on a larger cookie sheet (in case you get bubbling over) and place on the center rack in the oven. Bake for 35 minutes or until lightly brown (see photo below). Serve warm. REMINDER: Let it completely cool before covering (if covered too soon the crust will get soggy).

THE PERFECT BITE & THE PERFECT PAIRING

Of course, the perfect bite would include some vanilla ice cream set on top of your serving while the cobbler is still warm.

THE PERFECT HEALTH

Cherry cobbler, despite being a dessert, offers some health benefits due to its main ingredient, cherries. Cherries are rich in antioxidants, vitamins, and minerals, which can contribute to heart health, reduce inflammation, and potentially improve sleep. However, it’s important to consider that the overall health impact of cherry cobbler depends on the recipe and portion sizes, as added sugars and refined flours can negate some of the positive effects.

Quiche Lorraine


I love eggs in almost any form. But the traditional Quiche Lorraine is my all-time favorite. I received a beautiful deep-dish pie plate as a gift and “I’m making quiche!” was my first thought.

INGREDIENTS

  • All-purpose flour, for dusting
  • 1 pie crust (I chose to use Pillsbury rolled pie crust since I wanted to use my own pie plate. But use frozen or homemade if you want – you do you. Just be sure it’s deep-dish)
  • 8 bacon slices
  • 1 shallot, finely chopped
  • 1 1/2 cups shredded Gruyère, divided (I used the Private Selection Alpine blend of Swiss & Gruyère)
  • 6 large eggs
  • 1 1/2 cups half & half or heavy cream
  • 1 tbsp of dijon mustard
  • Pinch of cayenne
  • Pinch of grated fresh nutmeg
  • Kosher salt
  • Freshly ground black pepper

TIME TO COOK

Arrange a rack in the center of the oven; preheat to 375°. On a lightly floured surface, roll out dough to 1/4″ thick. If using the pre-rolled such as Pillsbury, unroll carefully and patch up any tears. Loosely drape over a 9″ pie plate and crimp edges. Refrigerate until ready to use. Par-bake (known as blind bake) at 400° for 10-15 minutes or until lightly golden brown. This helps to keep from having a soggy bottom. It helps to dock it with a fork first, so it doesn’t puff up. When you remove it from the oven, immediately brush the entire crust with the dijon mustard while it’s still warm. This is an added layer of flavor that plays well with the nuttiness of the cheese. Let it completely cool before filling with ingredients.

While you blind bake your crust, cook the bacon in either a skillet or air fryer. You choose but you do want crispy bacon so it holds up in the egg mixture. Transfer to a paper towel-lined plate to drain, then crumble.

When your pie crust has cooled, scatter crumbled bacon evenly across the bottom. Top with shallot and 1 cup of shredded cheese.

In a large bowl, whisk eggs, cream, cayenne, and nutmeg; season with salt and black pepper. Pour over shallot mixture. Sprinkle with the remaining 1/2 cup of cheese. Do not stir or mix – the layers will naturally distribute evenly when you pour the mixture over them.

Bake quiche until crust is golden brown and eggs are cooked through, about 45-50 minutes. If your crust is starting to burn, loosely place over the top or around the edges. I test for doneness by gently inserting a toothpick in the very center. If it comes out wet, bake 5 more minutes until the toothpick comes out dry. Let cool 15 minutes before serving.

THE PERFECT BITE

Of course, the perfect bite will include the bacon, onion. cheese, egg, and crust!

THE PERFECT PAIRING

A lightly dressed arugula or spinach salad makes a perfect side to the richness of this quiche. Having this for brunch? Try pairing this with a light, crisp Prosecco such as this one from Josh Cellars.

THE PERFECT HEALTH

Though Quiche Lorraine can be high in fat and calories due to the cheese and bacon, However, a single slice of Quiche Lorraine can contain about 21g of protein which is great news for those who follow a high-protein diet. As in all things though, moderation is key.

Loaded Cauliflower Soup – Instant Pot


Image borrowed from ChewNibbleNosh until I can take one.

It’s finally soup weather after a long summer that started in April and has lasted through mid-October. So I grabbed my Instant Pot and was simply inspired just by the veggies I had handy.

INGREDIENTS

1 head cauliflower (broken into chunks)

2 poblano peppers (stem/seeds removed)

1 medium-sized sweet onion

1 leek stalk (white/light green parts)

2-3 cloves of garlic

3 fresh bay leaves (2 if dried)

4-5 fresh twigs of thyme (1 tsp if dried)

4-5 cups chicken stock (I used homemade)

½ cup crème fraiche (or cream cheese)

½ cup of half & half (or heavy cream)

4 strips of bacon

Grated cheddar, swiss or gruyere for topping

S&P to taste

Continue reading

Chicken Tinga Bowl


I love a bowl. And this is super easy, especially since it’s made primarily of leftovers! The chicken Tinga is a recipe I have made often thanks to Valerie Bertinelli and her Food Network cooking show. She makes everything look so easy and this one really is! I’ll post her recipe as I made it below but you can also click the link above and see her full chicken Tinga taco recipe, including toppings.

INGREDIENTS

CHICKEN TINGA

1 tablespoon grapeseed oil (or any high smoke point oil)

1 small yellow onion, chopped (I used sweet onion)

2 chipotles in adobo, finely chopped (look for these in re-sealable jars now!)

2 garlic cloves, minced 

1 tablespoon ground cumin 

1 teaspoon kosher salt 

1/2 teaspoon cayenne pepper 

One 10-ounce can diced tomatoes and green chiles 

1 cup chicken stock 

1 rotisserie chicken, shredded 

BOWL BUDDIES

1 cup canned black beans, rinsed and heated with cumin, cayenne, and homemade pico de gallo all to taste

1 cup fire roasted corn, thawed to room temp (I used Trader Joe’s frozen)

1 quarter of a head of iceberg lettuce, shredded or chopped

1 half of an avocado, sliced

1 handful of pickled red onions (or to taste)

1 handful of crumbled cotija cheese (or to preference)

READY TO COOK?

Heat the oil in a large sauté pan over medium-high heat. Add the onions and sauté until they begin to soften, about 3 minutes. Add the chipotles, garlic, cumin, salt and cayenne and sauté until fragrant, about 1 minute. Stir in the tomatoes and stock and cook until they begin to simmer, about 2 minutes. Turn off the heat and carefully ladle the sauce into a heat-safe blender. Puree until smooth. Pour the sauce back into the pan over medium heat and add the chicken, stirring to incorporate the chicken into the sauce. Cook until the sauce has thickened, about 5 minutes.

Either let the chicken cool a bit if using for the bowl right away, or reheat if using leftovers because Valerie’s Chicken Tinga Tacos looked so good you had to make those first and now you’re using leftovers. Which was the case for me. Either way, you want the chicken warmed but not piping hot as it will wilt the lettuce.

First layer is your shredded lettuce. I used iceberg because I wanted crunch. But you do you. Why do people give iceberg such a bad rap? They say it’s mostly water. Well, last time I checked water was good for you!

But I digress, layer your crunchy water lettuce on the bottom, then I like to put the beans in one third, then the corn in another and the chicken in the last third (see photo). Then in the center top with slices of avocado and picked red onion, and then sprinkle the whole thing generously with the crumbled cotija cheese. I mean – you can just throw it all in the bowl at once and have a party. No need for such precision. It will taste just as good. But I like my food to look styled before I eat it. I probably watch too much Food Network.

THE PERFECT BITE

You know me, I’m a fork-stacker. And this is the perfect dish for that. Just get in there and get a little of everything. Guaranteed to be the perfect bite. I also love that this dish has the perfect mix of hot and cold. Cold, crisp lettuce and the sweet crunchy, corn contrasted with the warm, spicy chicken and tangy beans is utterly delightful.

THE PERFECT PAIRING

I know most would say that an ice cold beer would pair best with a chipotle heavy dish… but if you’re like me and prefer wine over beer, I suggest a chardonnay. It’s buttery texture will help cool your palette from the heat of the chilis. Or, to stay in the Mexican theme try making my Pineapple Aqua Fresca. It’s really refreshing!

THE PERFECT HEALTH

The vitamin A in chipotles is in the form of carotenoids like lutein and beta-carotene, which are antioxidants. Your body converts carotenoids into vitamin A. The antioxidants in chipotle peppers can help to lower blood pressure, thus reducing your risk of developing cardiovascular disease and diabetes.

I also love that when you blend Tinga sauce it becomes rich and creamy with no dairy whatsoever… making this pretty guilt free!

Peppermint Chocolate Martini


I typically don’t like super sweet drinks.  But man-oh-man this is one tasty beverage. More boozy desert than anything.  Very simple to make and perfect on a cozy winter evening.  Enjoy!

Tools you’ll need:

  • cocktail shaker
  • measuring cup
  • grater or plane
  • handful of ice
  • chilled martini glass

Ingredients

  • 4oz your favorite vodka 
  • 4oz chocolate liqueur (I used Trader Vic’s because they were out of Ghirardelli)
  • 4oz Bailey’s original
  • Chocolate syrup
  • Ghirardelli peppermint bark square (or any chocolate you have – but this is the peppermint element) 

Combine first three ingredients in the cocktail over ice. Shake really well.  Shave about a tablespoon of the chocolate bar of your choice and set aside. Put a small dot of the chocolate syrup on your finger and run it around the rim of the frosted glass. Repeat until the rim has chocolate syrup all around it. Roll through the shavings until coated. You could also use crushed candy canes for this.

Right before you are ready to pour, drizzle chocolate syrup along the walls around the inside of the glass.  Immediately pour shaken mixture into glass before the chocolate starts to drip.

PRO TIP: Having all ingredients cold helps the look of  the drink hold up. So does frosting the glass. 

White Bean Chicken Chili


The minute the weather drops below 70° I start craving chili. And this is one of my favorites. The key to making this extra special (I even had a co-worker cuss when he tried it!) is using my garlic broth as your base. This recipe is for the stovetop but can be adapted for the slow cookers or Instant Pot.

INGREDIENTS

  • 1 1/2 pounds boneless, skinless chicken cubed or shredded if using pre-cooked
  • 2 cups garlic broth (or use plain chicken stock if you must)
  • 1 whole medium sweet onion, chopped
  • 3/4 teaspoon garlic powder (omit if using the garlic broth)
  • 2 tablespoons olive oil
  • 1 can Great Northern Beans, drained and rinse
  • 1 can white cannellini beans, drained and rinsed
  • 1 can white chili beans not drained or rinsed
  • 2 cans (4 oz) chopped green chilies (sub 1 can of jalapeños if you like it spicier)
  • 1 1/4 teaspoon Kosher salt
  • 1 1/2 teaspoons dried Mexican oregano
  • 1 teaspoon ground cumin
  • 1/2 teaspoon black pepper
  • 1/4 teaspoon cayenne pepper
  • 1/2 cup sour cream
  • 1/2 cup half & half or heavy cream
  • Shredded cheddar cheese, for serving (optional)
  • a handful of the tortilla chips crumbs from the bottom of the bag (optional)

READY TO COOK?

Heat oil in a large soup pot. Sauté chicken, onion and 1/4 tsp of salt until chicken is no longer pink. If you are using a store bought rotisserie (which I often do!) just sauté onion until soft and translucent.

Add beans, broth, chilis, and seasonings (everything but the dairy). Bring to a boil. Reduce heat and simmer uncovered for 30 minutes. Remove from heat and stir in sour cream and half & half. Serve garnished with cheese and tortilla chip crumbles, if desired.

THE PERFECT BITE

Obviously the perfect bite would be to have a spoonful of everything on it – but I also like to use a big tortilla chip as my spoon!

THE PERFECT HEALTH

To reduce the fat or omit dairy altogether – reserve half of the can of the Great Northern Beans and puree in the blender with half of a can of the broth or stock. Pour into the pot at the end and stir to thicken the chili. Your chili will not be as white as what’s pictured here but it will be creamy and dairy-free!

Homemade Chicken Stock in the Instant Pot


So, just what is the difference between stock and broth? According to Food & Wine broth is something you sip and stock is what you cook with. Stock is typically made from bones with added aromatics (i.e., carrots, celery, onion, garlic and assorted herbs). Broth is typically made using stock and then adding additional flavors to be enjoyed for sipping or a base for soup. For example, I make my favorite garlic broth (it’s literally simmering on the stove as I type this) using this stock recipe I’m about to share with you for the base.

For this recipe I use either the carcass of a chicken I’ve roasted myself, a rotisserie chicken the store cooked for me or raw chicken wings (the large whole ones). The roasted and rotisserie chicken bones are going to bring a richer flavor but are pricier than the wings. But just use whatever you have or can get!

Regardless of what version of chicken you use, the flavor comes from the skin and bones. if using a cooked carcass be sure to pick off all the meat and use it for something else. We are cooking this for a long time and it will be mush and not really tasty. If using raw wings, throw the whole thing in there. Are usually keep raw wings in the freezer when I want to make a quick no first batch of stock and don’t have time to cook a whole chicken.

Ingredients (measurements are for a 6qt Instant Pot and yields about 5-6 qts)

  • 1 whole roasted or rotisserie chicken carcass with skin (remove meat), or 3-4 whole raw chicken wings.
  • 2-3 celery sticks cut in half and washed – include leaves if they have them
  • 2-3 unpeeled carrots washed and cut in half
  • 1 large sweet onion with peel left on (this helps give the stock a beautiful golden color). Cut in quarters.
  • 3-4 whole garlic cloves. No need to peel but be sure to smash so flavor can release.
  • 10 whole peppercorns
  • 2-3 bay leaves
  • 1 teaspoon of salt (add more to taste when finished cooking)
  • 2 sprigs of fresh or 1 teaspoon of dry thyme
  • 2 sprigs of fresh or 1 teaspoon of dry oregano
  • 2 sprigs of fresh or 1 teaspoon of dry rosemary
  • 2 sprigs of fresh or 1 teaspoon of dry sage
  • 6 cups of water or fill to an inch over contents. Do not exceed fill line on Instant Pot insert.

Ready to Cook?

Throw all ingredients into the pot and cover with the water. Close the lid of your Instant Pot and set to seal if not automatic. Set to pressure cook on high for 2.5 hours. This will really get all the good flavor and gelatin out of the skin and bones. Let naturally release for 30 minutes. It will take about 20 minutes for your pot to come to pressure so total cook time will be about 3:20. You can let it go longer with no problem – but I wouldn’t cook it less or you will miss out on all the depth of flavor a long pressure cook will bring.

Once your natural release is done, carefully remove the lid. I use a large ladle to remove the bones and veg from the pot. These have served their purpose and really have no life left in them so they can be tossed or composted. Thanks bones and veg! I turn off the warmer and let it cool for 30 minutes to avoid burning myself – which is inevitable. Once it’s cooled some, strain the liquid through a fine mesh strainer or cheesecloth with a large bowl underneath. I store my stock in gallon-size ball jars that I got on Amazon. You can use a fat separator if you want, or just put in the fridge and the fat will rise to the top and solidify and you can scrape off. If you’re not watching your fat intake then skip this part!

PRO TIP: I use this quite often so I typically do not have the need to freeze it. However, it does freeze well. Freeze in single portion freezer Ziploc bags to easily grab the amount you need. Should last in the refrigerator in an airtight container for a good 2 weeks and in the freezer for 3 months.

THE PERFECT PAIRING

I personally love to just sip this broth by itself. But it makes an incredible base for some home pho, or chicken and dumplings or just about any comfort soup that’s calling your name. I also use one cup of it as the liquid when cooking chicken breasts or pork shoulder in the Instant Pot. I also use it when making rice in the IP – adds delicious flavor!

THE PERFECT HEALTH

Bone broth is all the health rage and pressure cooking this for at least the 2.5 hours I suggest gets all the gelatinous goodness out of the bones – which is great for reducing inflammation and good for gut health.

Super Creamy Almond Butter


almond butter

How have I had my Ninja food processer and blender for 3 years and not know it was powerful enough to make nut butter? I have the Auto IQ Boost system and quite frankly – I just use the start and stop button to make smoothies and hummus.

But after a trip to the store to get some almond butter only to discover that the cheapest I could find was $7.00 – I decided I was crafty enough to make my own. I mean, it’s just almonds and salt, right?

So after doing some research and deciding that I think my Ninja can handle the job (even though there’s no preset button for nut butter)… I found raw organic almonds, bought $3 worth and gave it a whirl. Literally. And it did not disappoint! Keep ready for instructions.

INGREDIENTS

  • 2 cups organic raw almonds (or however much you want to make)
  • 1 teaspoon of kosher sea salt (or to taste)
  • 1 drizzle of honey (optional)
  • 1 drizzle of extra virgin olive oil (optional)

TOOLS NEEDED

  • High-powered blender or food processor
  • Spatula
  • Cookie Sheet
  • Parchment paper

READY TO MAKE IT?

almond butter2

Preheat oven to 350 degrees.

Place parchment paper on cookie sheet and spread almonds in a single layer.  No oil is needed.

Roast almonds for 10 minutes and let cool until they are still warm but not hot. You can buy pre-roasted/salted almonds and it will work fine. But the flavor isn’t as good and you don’t get to control the level of salt used.

Add roasted almonds to your blender or food processor and depending on your unit turn it to high speed and let it go. It will take roughly 10 minutes to get it to a smooth consistency. It will seem like it’s never going to happen but be patient! Every few minutes stop the machine and scrape down the sides with the spatula to make sure all your almond goodness is incorporated. Keep in mind, your blender is going to heat up some from working so hard and for so long. You may want to let it cool off for a minute when you pause to scrape down the sides.

And if you are patient and let it go long enough it will eventually become creamy!  Now, this is optional… if you want to add a small drizzle of olive oil to help it along – that is perfectly okay. It’s heart-healthy after all. But if you are avoiding oil then just rely on your patience.

Be sure to wait until your almond butter is just about the consistency you want before adding salt or any other add ons. I suggest tasting it before adding anything so you know what it needs. It added just a little salt and a drizzle of honey and it was good to go. This homemade version is WAY tastier than any store-bought almond but I’ve ever tasted… and was half the cost!

THE PERFECT BITE

s-l640

I put a warm slather of almond goodness on a toasted piece of Dave’s Killer Bread. So much nuttiness!


THE PERFECT HEALTH

Almonds contain lots of healthy fats, fiber, protein, magnesium and vitamin E.

The health benefits of almonds include lower blood sugar levels, reduced blood pressure and lower cholesterol levels. They can also reduce hunger and promote weight loss.

All things considered, almonds are as close to perfect as a food can get.

Read more HERE.


Cold-start Yogurt in the Instant Pot


Cup of yogurt

This recipe is for what is called a “cold start yogurt” process. It omits the need to boil the milk first because you use Fairlife milk which is ultra-filtered. This really is a very simple process – however, there are some important details to know in order to successfully achieve creamy, delicious yogurt – so you’re going to want to read this whole post before you get started.

What is Fairlife Milk?

  • Fairlife Milk is an ultra-filtered product, which runs through “soft” filters to concentrate the Milk and remove impurities
  • There is more natural protein and calcium which comes directly from the Milk.
  • Because of the Filtration process, the Milk is higher in protein and calcium.
  • There is less sugar and the Milk is Lactose-Free!
  • Fairlife Milk is not organic but is ultra-pasteurized.

DISCLAIMER:  This is not an advertisement for Fairlife. This Instant Pot cold-start yogurt recipe is not to be used with milk that hasn’t been through an ultra-filtration process, like Fairlife which is different than ultra-pasteurized. Regular milk has some bacteria that need to be brought up to 180 degrees prior to making yogurt.

Okay – back to our regularly scheduled program: I wanted a vanilla-based yogurt for this batch and opted to put the vanilla creamer and the sweetened condensed milk in the mix at the beginning of the process to get a more intensified vanilla flavor (and boy did I!).  Because this makes about 96oz of yogurt (I filled 12 8oz jars) you might want to do it at the end and divide your yogurt in half so you can have both vanilla yogurt and plain yogurt for savory purposes.

IngredientsCast of Characters

  • 1-52oz Fairlife whole milk (Fairlife does have skim milk but it will definitely change the consistency)
  • 1-cup of natural bliss creamer (or use two tablespoons vanilla extract – omit if you want plain yogurt)
  • 1/2 a can of sweetened condensed milk (you can substitute 1/4 cup of honey – omit if you want plain yogurt)
  • *2-Tablespoons of store-bought yogurt (this is the starter – you can save 2 tablespoons from this batch for your next one).

*It’s critical for you to check the ingredient list of the store-bought yogurt when you’re shopping for a yogurt starter. It must have active bacterial cultures for it to work as the yogurt starter.  A live culture usually contains at least 2 types of bacteria (L. bulgaricus and S. thermophilus). I used Oui for this recipe but Oikos and Fage are both good options and have unflavored plain yogurt if you’re going that route.  Dairy-free yogurt will not work. Continue reading